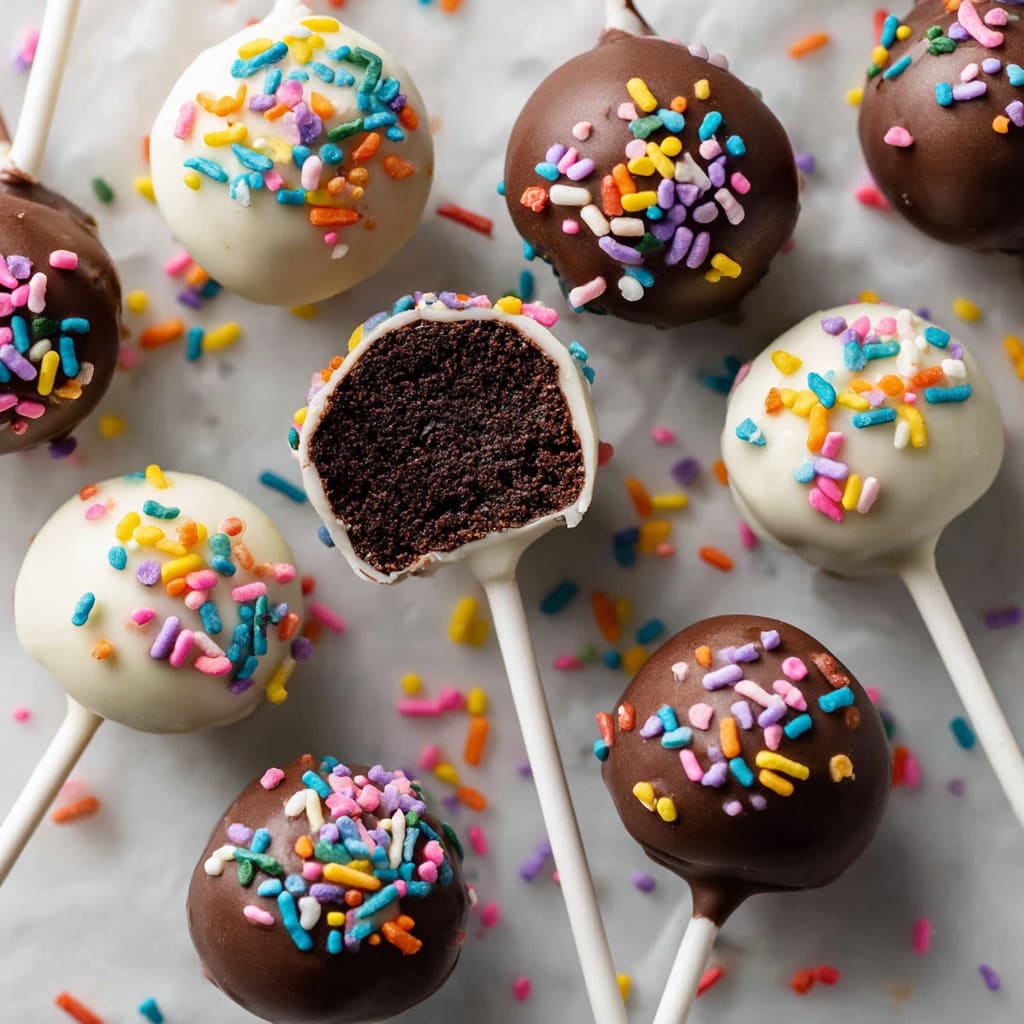
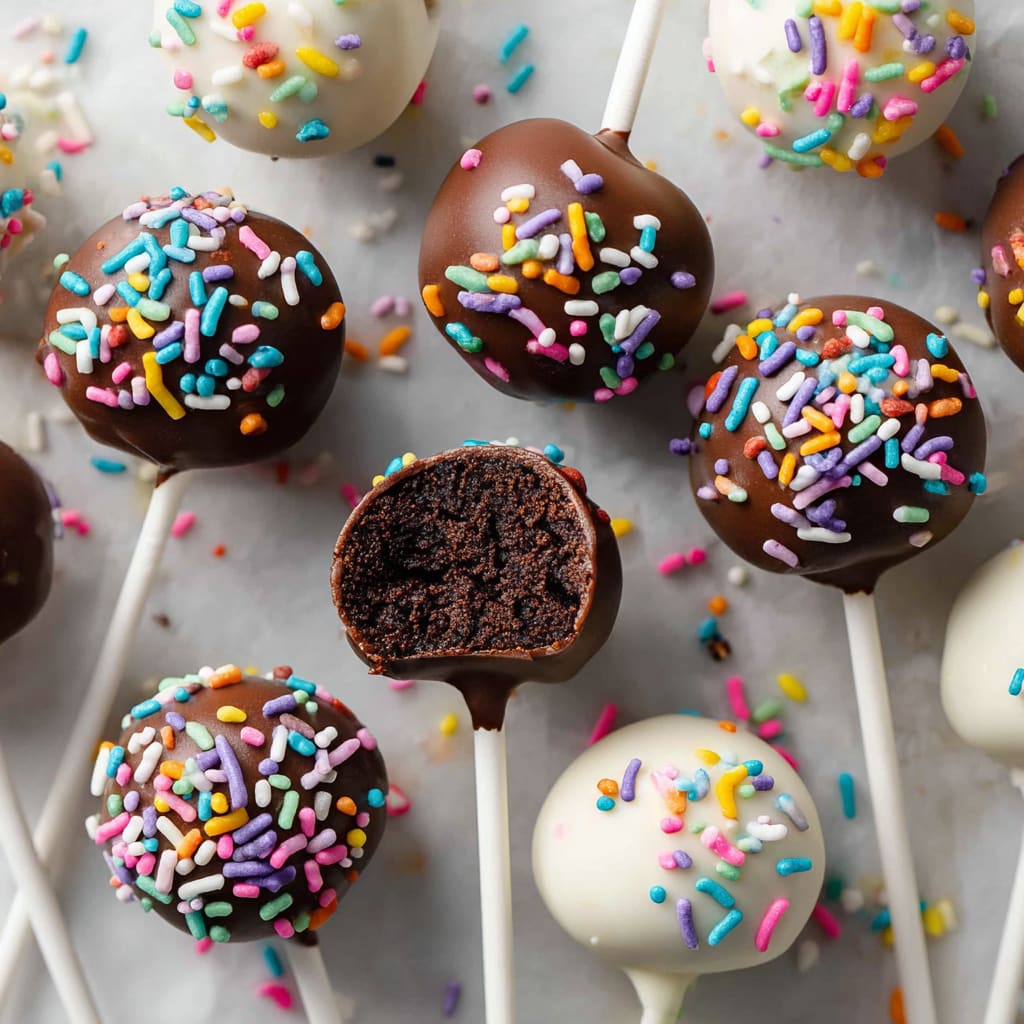
Bite into the moist, decadent goodness of these irresistible Chocolate Cake Pops that combine rich chocolate cake with creamy frosting, all enrobed in a smooth chocolate shell that cracks perfectly with each bite. These delightful treats strike the perfect balance between fudgy cake and sweet coating, making them impossible to resist at parties, celebrations, or as an indulgent afternoon treat. Whether you’re looking to impress guests or simply satisfy your sweet tooth, these Chocolate Cake Pops deliver an unforgettable dessert experience on a stick. You’ll learn how to create bakery-quality cake pops at home with foolproof methods that ensure perfect results every time.
Why You’ll Love This Recipe
These Chocolate Cake Pops are about to become your go-to dessert for every occasion, and for good reason. The contrast between the moist, tender cake interior and the crisp chocolate coating creates a textural symphony that makes each bite utterly satisfying. Unlike store-bought versions, these homemade treats allow you to control the sweetness level and customize flavors to your preference.
What makes this recipe truly special is its versatility and make-ahead potential. You can prepare these Chocolate Cake Pops days in advance, making them perfect for busy hosts who want to impress without last-minute stress. They’re also portion-controlled, giving guests the perfect sweet bite without the commitment of a full slice of cake.
Parents especially appreciate how these neat, hand-held treats keep little ones’ fingers relatively clean while delivering maximum chocolate enjoyment. The recipe is also forgiving for beginners but offers enough creative potential to satisfy experienced bakers looking to experiment with decorations and flavor combinations.
Ingredients
For the cake base:
- 1 box (15.25 oz/432g) chocolate cake mix
- 3 large eggs, at room temperature
- 1/2 cup (120ml) vegetable oil
- 1 cup (240ml) water
For the cake pop assembly:
- 1/2 cup (113g) cream cheese frosting (store-bought or homemade)
- 16 oz (450g) high-quality chocolate candy melts or chocolate chips
- 2 tablespoons (30ml) vegetable shortening or coconut oil
- 40-50 lollipop sticks
- Sprinkles, crushed nuts, or other decorations (optional)
The success of these Chocolate Cake Pops relies on using quality chocolate that melts smoothly. Dark chocolate (60-70% cacao) provides a less sweet coating that balances the cake’s sweetness, while milk chocolate delivers a more traditional flavor profile that children particularly enjoy. The cream cheese frosting adds moisture and tanginess that elevates the chocolate cake base beyond ordinary cake pops.
Pro Tips
Perfect Cake-to-Frosting Ratio: The most common mistake when making Chocolate Cake Pops is adding too much frosting, resulting in overly sweet, mushy pops that fall off the sticks. Start with just 1/4 cup of frosting mixed into your crumbled cake, then add more in small increments only if the mixture is too dry to hold together when compressed in your palm. The ideal consistency should resemble play-dough—firm enough to hold its shape but not sticky or wet.
Chilling Is Non-Negotiable: After forming your Chocolate Cake Pops into balls, refrigerate them for at least 2 hours or freeze for 20 minutes before dipping. This critical step solidifies the cake balls, preventing them from falling apart during the dipping process. Additionally, cold cake pops help the chocolate coating set more quickly, reducing the risk of dripping and creating a smoother finish.
Dipping Technique Matters: For perfectly coated Chocolate Cake Pops, first dip the tip of each stick into melted chocolate before inserting it into the cake ball—this creates an “anchor” that prevents the pop from sliding off. When dipping the formed pop, use a deep, narrow container filled with melted chocolate. Dip in one smooth motion, then gently tap your wrist (not the pop itself) to remove excess coating while rotating to ensure even coverage.
Instructions
Step 1: Prepare the Cake
Preheat your oven to 350°F (175°C) and grease a 9×13-inch baking pan. In a large bowl, combine the chocolate cake mix, eggs, oil, and water. Beat with an electric mixer on medium speed for 2 minutes until smooth and well combined. Pour the batter into the prepared pan and bake for 25-30 minutes, or until a toothpick inserted in the center comes out with a few moist crumbs. Allow the cake to cool completely in the pan.
Step 2: Create the Cake Pop Mixture
Once cooled, crumble the entire cake into fine crumbs in a large bowl. Use your hands to break up any large pieces until no large chunks remain. Add 1/4 cup of the cream cheese frosting and mix thoroughly with a spatula. Continue adding small amounts of frosting until the mixture holds together when squeezed in your palm but isn’t soggy. The texture should be similar to modeling clay—moist but firm.
Step 3: Form the Cake Balls
Line a baking sheet with parchment paper. Using a cookie scoop or tablespoon, portion the Chocolate Cake Pop mixture into equal amounts (about 1-1.5 tablespoons each). Roll each portion between your palms to form smooth, round balls. Place the balls on the prepared baking sheet and refrigerate for at least 2 hours or freeze for 20 minutes until firm.
Step 4: Prepare for Dipping
Melt your chocolate candy melts or chocolate chips with vegetable shortening in a microwave-safe bowl, stirring every 30 seconds until smooth. The shortening helps create a thinner consistency perfect for dipping. Transfer the melted chocolate to a deep, narrow container. Dip the tip of each lollipop stick about 1/2 inch into the melted chocolate, then insert it into a chilled cake ball, pushing it about halfway through.
Step 5: Dip and Decorate
Once all sticks are inserted, dip each Chocolate Cake Pop completely into the melted chocolate in one smooth motion. As you lift it out, gently tap your wrist (not the pop) to remove excess coating while slowly rotating the pop. Immediately add sprinkles or other decorations before the chocolate sets. Place the dipped cake pops upright in a cake pop stand or a block of styrofoam to dry completely.
Variations
Red Velvet Chocolate Cake Pops: Substitute the chocolate cake mix with red velvet cake mix for a stunning visual contrast when bitten into. The tangy cream cheese frosting pairs perfectly with red velvet, and the bright red interior creates a beautiful surprise inside the chocolate coating. These are particularly stunning for Valentine’s Day or Christmas gatherings.
Triple Chocolate Indulgence: Elevate your Chocolate Cake Pops by mixing mini chocolate chips into the cake and frosting mixture. Then, after dipping in the chocolate coating, drizzle with contrasting white or dark chocolate for a luxurious triple-chocolate experience. This variation adds textural interest and intensifies the chocolate flavor for true chocolate enthusiasts.
Gluten-Free Option: Create inclusive Chocolate Cake Pops by using a gluten-free chocolate cake mix. The dense, moist nature of cake pops actually works wonderfully with gluten-free mixes, as any slight texture differences are masked by the frosting and chocolate coating. Always verify that your chocolate coating and decorations are also gluten-free if serving to those with celiac disease or gluten sensitivities.
Storage and Serving
These Chocolate Cake Pops maintain peak freshness when stored in an airtight container in the refrigerator for up to one week. For best texture, allow them to come to room temperature for 15-20 minutes before serving. If you need to store them longer, they freeze beautifully for up to three months when wrapped individually in plastic wrap and placed in a freezer-safe container.
For an elegant dessert table presentation, arrange your Chocolate Cake Pops in a decorative stand with varying heights, or place them in a decorative vase filled with sugar or sprinkles to hold them upright. For gifting, wrap individual cake pops in clear cellophane bags tied with ribbons that match your event’s theme.
Serve these treats alongside coffee or hot chocolate for a delightful after-dinner dessert experience. For children’s parties, consider arranging them in colorful cups filled with sprinkles or candy to double as both dessert and take-home party favors that will delight young guests.
FAQs
Why are my cake pops falling off the sticks?
This typically happens when the cake balls aren’t chilled enough before dipping or when the mixture is too moist. Ensure your Chocolate Cake Pops are thoroughly chilled and that you’ve dipped the stick in chocolate before inserting it into the ball, creating an anchor that hardens and secures the pop.
Can I make cake pops without a cake pop maker?
Absolutely! Most professional bakers prefer the hand-rolling method described in this recipe. While cake pop makers can bake spherical cakes, they often produce less moist Chocolate Cake Pops than the crumbled cake and frosting method we’ve outlined.
Why is my chocolate coating cracking?
Temperature shock causes cracking. If your Chocolate Cake Pops are too cold when dipped into hot chocolate, the sudden temperature change makes the coating contract and crack. Let frozen cake balls sit at room temperature for 5-10 minutes before dipping.
How far in advance can I make these for a party?
You can make Chocolate Cake Pops up to 5 days ahead when stored properly in the refrigerator, or up to 3 months ahead if frozen. This makes them perfect for party prep or busy holiday seasons when you want to work ahead.
Can I use homemade cake instead of boxed mix?
Definitely! Any dense, moist chocolate cake recipe works wonderfully for Chocolate Cake Pops. In fact, homemade cake often produces even more flavorful results, though boxed mixes offer convenience and consistent results that many bakers appreciate.

Chocolate Cake Pops
- Prep Time: 30 minutes
- Cook Time: 30 minutes
- Total Time: 1 hour
- Yield: 40-50 cake pops
- Category: Dessert
- Method: Baking, Mixing, Chilling, Dipping
- Cuisine: Americaine
Description
Chocolate Cake Pops – Indulgent and irresistible treat made with rich chocolate cake crumbles, blended with creamy frosting, and coated in luscious chocolate.
Ingredients
- chocolate cake mix
- eggs
- vegetable oil
- water
- cream cheese frosting
- high-quality chocolate candy melts or chocolate chips
- vegetable shortening or coconut oil
- lollipop sticks
- sprinkles, crushed nuts, or other decorations
Instructions
- Step 1: Prepare the Cake Preheat your oven to 350°F (175°C) and grease a 9×13-inch baking pan. In a large bowl, combine the chocolate cake mix, eggs, oil, and water. Beat with an electric mixer on medium speed for 2 minutes until smooth and well combined. Pour the batter into the prepared pan and bake for 25-30 minutes, or until a toothpick inserted in the center comes out with a few moist crumbs. Allow the cake to cool completely in the pan.
- Step 2: Create the Cake Pop Mixture Once cooled, crumble the entire cake into fine crumbs in a large bowl. Use your hands to break up any large pieces until no large chunks remain. Add 1/4 cup of the cream cheese frosting and mix thoroughly with a spatula. Continue adding small amounts of frosting until the mixture holds together when squeezed in your palm but isn’t soggy. The texture should be similar to modeling clay—moist but firm.
- Step 3: Form the Cake Balls Line a baking sheet with parchment paper. Using a cookie scoop or tablespoon, portion the Chocolate Cake Pop mixture into equal amounts (about 1-1.5 tablespoons each). Roll each portion between your palms to form smooth, round balls. Place the balls on the prepared baking sheet and refrigerate for at least 2 hours or freeze for 20 minutes until firm.
- Step 4: Prepare for Dipping Melt your chocolate candy melts or chocolate chips with vegetable shortening in a microwave-safe bowl, stirring every 30 seconds until smooth. The shortening helps create a thinner consistency perfect for dipping. Transfer the melted chocolate to a deep, narrow container. Dip the tip of each lollipop stick about 1/2 inch into the melted chocolate, then insert it into a chilled cake ball, pushing it about halfway through.
- Step 5: Dip and Decorate Once all sticks are inserted, dip each Chocolate Cake Pop completely into the melted chocolate in one smooth motion. As you lift it out, gently tap your wrist (not the pop) to remove excess coating while slowly rotating the pop. Immediately add sprinkles or other decorations before the chocolate sets. Place the dipped cake pops upright in a cake pop stand or a block of styrofoam to dry completely.
Notes
Fresh ingredients will always yield the best flavor results.
Nutrition
- Serving Size: 1 cake pop
- Calories: 180 calories
- Sugar: 12 grams
- Sodium: 90 mg
- Fat: 10 grams
- Saturated Fat: 5 grams
- Unsaturated Fat: 4 grams
- Trans Fat: 0 grams
- Carbohydrates: 20 grams
- Fiber: 1 gram
- Protein: 2 grams
- Cholesterol: 15 mg