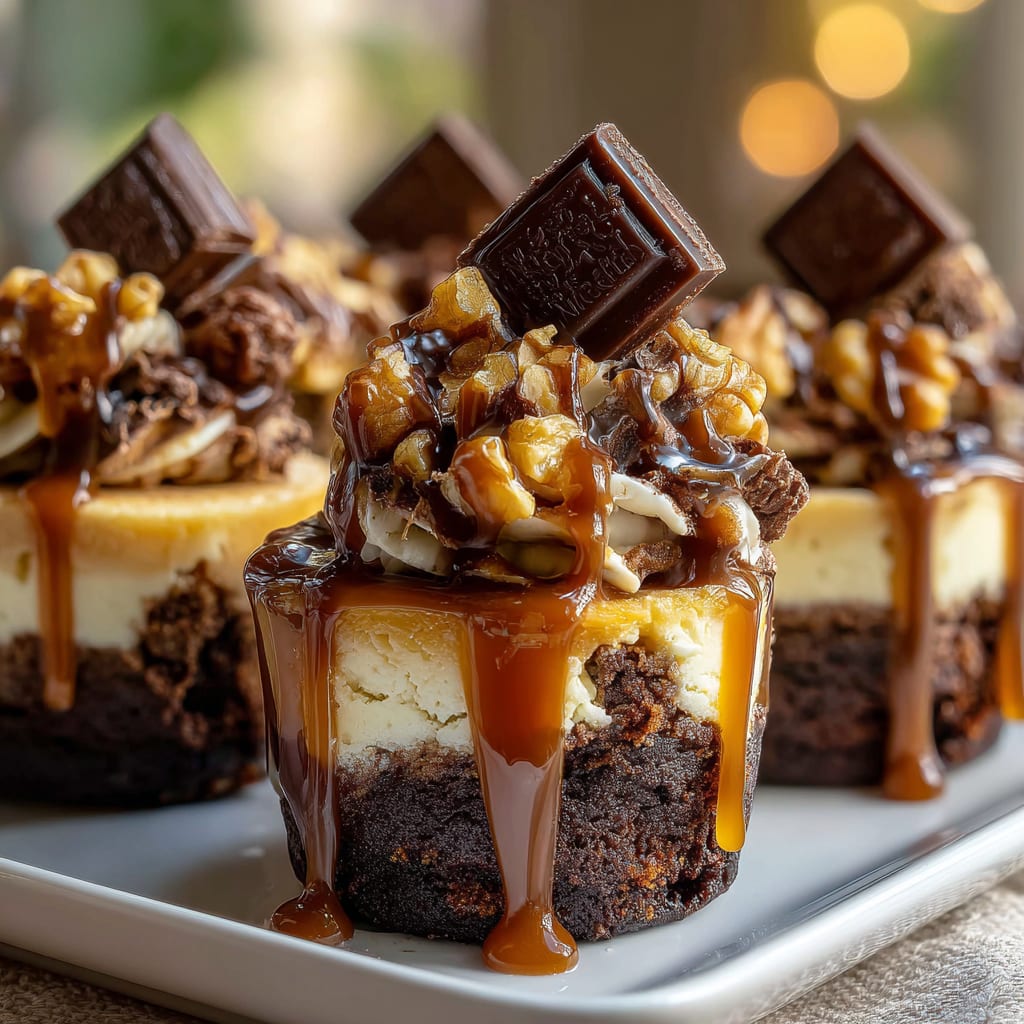
Imagine sinking your teeth into a decadent dessert that combines the fudgy richness of brownies with the creamy tang of cheesecake, all in one perfect, portable cup. These Loaded Brownie Cheesecake Cups are the ultimate indulgence for any chocolate lover, offering layers of contrasting textures and complementary flavors that will make your taste buds dance with joy. The buttery brownie base supports a velvety cheesecake filling, crowned with chocolate ganache and your favorite toppings. You’ll learn how to create these show-stopping treats that look impressive but are surprisingly simple to make.
Why You’ll Love This Recipe
These Loaded Brownie Cheesecake Cups will quickly become your go-to dessert for both everyday treats and special occasions. The contrast between the dense, fudgy brownie base and the light, creamy cheesecake layer creates an irresistible textural experience that satisfies multiple dessert cravings in a single bite.
What makes these cups truly special is their versatility and convenience. Baked in a muffin tin, they’re perfectly portioned for individual servings – no slicing required! This makes them ideal for parties, potlucks, or whenever you need a dessert that’s easy to serve and impossible to resist.
The richness of the chocolate brownie pairs beautifully with the slight tanginess of the cream cheese, creating a balanced flavor profile that isn’t overwhelmingly sweet. Plus, the customizable toppings mean you can make these brownie cheesecake treats uniquely yours every time. Whether you’re an experienced baker or just starting out, this foolproof recipe delivers professional-looking results with minimal effort.
Ingredients
For the Brownie Base:
- 1/2 cup (113g) unsalted butter, melted
- 1 cup (200g) granulated sugar
- 2 large eggs, room temperature
- 1 teaspoon vanilla extract
- 1/2 cup (42g) unsweetened cocoa powder
- 1/2 cup (63g) all-purpose flour
- 1/4 teaspoon salt
- 1/2 cup (90g) chocolate chips
For the Cheesecake Layer:
- 16 oz (454g) cream cheese, softened
- 1/2 cup (100g) granulated sugar
- 2 large eggs, room temperature
- 1 teaspoon vanilla extract
- 2 tablespoons sour cream
For the Chocolate Ganache:
- 1 cup (175g) semi-sweet chocolate chips
- 1/2 cup (120ml) heavy cream
Optional Toppings:
- Crushed Oreos
- Chocolate shavings
- Fresh berries
- Caramel sauce
The key to perfect Loaded Brownie Cheesecake Cups is using full-fat cream cheese, which provides the richest flavor and creamiest texture. High-quality cocoa powder ensures a deep chocolate flavor in the brownie base that stands up to the cheesecake layer.
Pro Tips
Water Bath Technique
For perfectly creamy cheesecake that doesn’t crack, place a shallow pan of water on the lowest oven rack while baking your Loaded Brownie Cheesecake Cups. The steam created provides gentle, consistent heat throughout the oven, preventing the cheesecake from drying out. This professional technique makes a noticeable difference in texture without the hassle of wrapping individual cups.
Temperature Control
Always use room temperature ingredients for the cheesecake layer, especially the eggs and cream cheese. Cold ingredients won’t blend smoothly and can result in a lumpy mixture. To quickly bring cream cheese to room temperature, cut it into cubes and let sit for 30 minutes, or microwave in 10-second intervals, checking frequently until just softened but not melted.
Perfect Swirl Technique
For a beautiful marble effect between the brownie and cheesecake layers, reserve 1/4 cup of brownie batter before adding to the muffin cups. After pouring the cheesecake mixture on top of the brownie base, drop small dollops of the reserved brownie batter on top and swirl with a toothpick or skewer, creating stunning patterns that will make your Loaded Brownie Cheesecake Cups look professionally made.
Instructions
Step 1: Prepare Your Pans
Preheat your oven to 325°F (165°C). Line a standard 12-cup muffin tin with paper liners and spray lightly with non-stick cooking spray. This prevents sticking and makes removal effortless after baking. Place a shallow pan filled with about 1 inch of hot water on the bottom rack of your oven to create a steam environment.
Step 2: Make the Brownie Base
In a medium bowl, whisk together the melted butter and sugar until well combined. Add the eggs one at a time, mixing well after each addition, then stir in the vanilla extract. In a separate bowl, whisk together the cocoa powder, flour, and salt. Gradually add the dry ingredients to the wet ingredients, mixing just until combined. Fold in the chocolate chips. Spoon about 1½ tablespoons of brownie batter into each muffin cup, creating an even layer at the bottom.
Step 3: Prepare the Cheesecake Layer
In a large bowl, beat the softened cream cheese with an electric mixer until smooth and fluffy, about 2 minutes. Add the sugar and continue beating until well incorporated. Add the eggs one at a time, mixing on low speed after each addition. Stir in the vanilla extract and sour cream until just blended. Be careful not to overmix – this can incorporate too much air into your Loaded Brownie Cheesecake Cups and cause them to crack during baking.
Step 4: Assemble and Bake
Carefully spoon the cheesecake mixture over the brownie base in each muffin cup, filling to about 1/4 inch from the top. If desired, create a marble effect using the reserved brownie batter as described in the Pro Tips section. Bake for 20-25 minutes, or until the edges are set but the centers still have a slight jiggle. Don’t overbake! The cheesecake will continue to set as it cools.
Step 5: Cool and Chill
Remove from the oven and let cool in the pan for 30 minutes. Transfer to a wire rack to cool completely, then refrigerate for at least 4 hours or overnight. This chilling time is crucial for developing the perfect texture in your Loaded Brownie Cheesecake Cups.
Step 6: Make the Ganache and Decorate
Place chocolate chips in a heat-proof bowl. Heat the heavy cream in a small saucepan until it just begins to simmer, then pour over the chocolate chips. Let sit for 2 minutes, then whisk until smooth and glossy. Allow to cool for 5-10 minutes until slightly thickened but still pourable. Spoon the ganache over each chilled cheesecake cup, then add your desired toppings while the ganache is still soft. Return to the refrigerator until ready to serve.
Variations
Peanut Butter Brownie Cheesecake Cups
Transform the classic Loaded Brownie Cheesecake Cups by adding 1/3 cup creamy peanut butter to the cheesecake mixture. Swirl additional melted peanut butter on top before adding the chocolate ganache, and finish with chopped peanut butter cups for an irresistible combination that will delight peanut butter enthusiasts. The nutty flavor complements the chocolate perfectly and adds another dimension to this already impressive dessert.
Mint Chocolate Brownie Cheesecake Cups
For a refreshing twist, add 1/2 teaspoon mint extract to the cheesecake layer and fold in 1/4 cup mini chocolate chips. Top the ganache with crushed mint chocolate cookies or Andes mints for a cool contrast to the rich chocolate. The mint flavor cuts through the richness of the Brownie Cheesecake Cups, creating a balanced and refreshing dessert option.
Gluten-Free Option
Substitute the all-purpose flour in the brownie base with a 1:1 gluten-free flour blend or almond flour for a delicious gluten-free alternative. Be sure to check that your cocoa powder and other ingredients are certified gluten-free. The texture remains fudgy and delicious, making these Loaded Brownie Cheesecake Cups accessible to those with gluten sensitivities without sacrificing flavor or quality.
Storage and Serving
These Loaded Brownie Cheesecake Cups can be stored in an airtight container in the refrigerator for up to 5 days. For the best texture and flavor, remove them from the refrigerator about 15 minutes before serving to take the chill off slightly. This allows the brownie layer to soften and the flavors to fully bloom on your palate.
For longer storage, these treats freeze beautifully. Place fully cooled and set cups on a baking sheet and freeze until solid, then wrap individually in plastic wrap and store in a freezer-safe container for up to 3 months. Thaw overnight in the refrigerator before serving.
For an elegant dessert presentation, place each Loaded Brownie Cheesecake Cup on a small plate with a dollop of whipped cream and fresh berries. Drizzle with additional chocolate ganache or caramel sauce for extra indulgence.
For a fun dessert bar idea, serve a variety of Brownie Cheesecake Cups with different toppings alongside small bowls of additional garnishes like chocolate shavings, crushed cookies, and various sauces, allowing guests to customize their own dessert experience.
FAQs
Can I make these Loaded Brownie Cheesecake Cups without a muffin tin?
Yes, you can use a mini cheesecake pan with removable bottoms or silicone muffin cups placed on a baking sheet. Alternatively, you could make this as a single 8-inch cake, but you’ll need to increase the baking time to about 45-55 minutes.
Why did my cheesecake layer crack?
Cracking typically happens from overmixing (which incorporates too much air), overbaking, or rapid temperature changes. Mix just until ingredients are combined, use a water bath, and allow to cool gradually in the oven with the door slightly open.
Can I use boxed brownie mix for the base?
Absolutely! Prepare the mix according to package directions, but reduce the amount slightly as boxed mixes tend to rise more than this homemade version. This is a great time-saving shortcut.
How do I know when the Loaded Brownie Cheesecake Cups are done baking?
They’re ready when the edges are set but the centers still have a slight jiggle when gently shaken. The cheesecake will continue to set as it cools. An instant-read thermometer inserted in the center should read 150°F (65°C).
Can I make these ahead for a party?
Definitely! These Loaded Brownie Cheesecake Cups are perfect for make-ahead desserts. You can prepare them up to 3 days in advance, keeping them refrigerated until about 15 minutes before serving. Add any fresh toppings just before presenting.
Loaded Brownie Cheesecake Cup
- Prep Time: 30 minutes
- Cook Time: 25 minutes
- Total Time: 4 hours 55 minutes
- Yield: 12 servings 1x
- Category: Dessert
- Method: Baking
- Cuisine: Americaine
Description
Loaded Brownie Cheesecake Cup with indulgent brownie base and creamy cheesecake filling, a decadent treat perfect for any sweet tooth!
Ingredients
- 1/2 cup (113g) unsalted butter, melted
- 1 cup (200g) granulated sugar
- 2 large eggs, room temperature
- 1 teaspoon vanilla extract
- 1/2 cup (42g) unsweetened cocoa powder
- 1/2 cup (63g) all-purpose flour
- 1/4 teaspoon salt
- 1/2 cup (90g) chocolate chips
- 16 oz (454g) cream cheese, softened
- 1/2 cup (100g) granulated sugar
- 2 large eggs, room temperature
- 1 teaspoon vanilla extract
- 2 tablespoons sour cream
- 1 cup (175g) semi-sweet chocolate chips
- 1/2 cup (120ml) heavy cream
Instructions
- Step 1: Prepare Your Pans Preheat your oven to 325°F (165°C). Line a standard 12-cup muffin tin with paper liners and spray lightly with non-stick cooking spray. This prevents sticking and makes removal effortless after baking. Place a shallow pan filled with about 1 inch of hot water on the bottom rack of your oven to create a steam environment.
- Step 2: Make the Brownie Base In a medium bowl, whisk together the melted butter and sugar until well combined. Add the eggs one at a time, mixing well after each addition, then stir in the vanilla extract. In a separate bowl, whisk together the cocoa powder, flour, and salt. Gradually add the dry ingredients to the wet ingredients, mixing just until combined. Fold in the chocolate chips. Spoon about 1½ tablespoons of brownie batter into each muffin cup, creating an even layer at the bottom.
- Step 3: Prepare the Cheesecake Layer In a large bowl, beat the softened cream cheese with an electric mixer until smooth and fluffy, about 2 minutes. Add the sugar and continue beating until well incorporated. Add the eggs one at a time, mixing on low speed after each addition. Stir in the vanilla extract and sour cream until just blended. Be careful not to overmix – this can incorporate too much air into your Loaded Brownie Cheesecake Cups and cause them to crack during baking.
- Step 4: Assemble and Bake Carefully spoon the cheesecake mixture over the brownie base in each muffin cup, filling to about 1/4 inch from the top. If desired, create a marble effect using the reserved brownie batter as described in the Pro Tips section. Bake for 20-25 minutes, or until the edges are set but the centers still have a slight jiggle. Don’t overbake! The cheesecake will continue to set as it cools.
- Step 5: Cool and Chill Remove from the oven and let cool in the pan for 30 minutes. Transfer to a wire rack to cool completely, then refrigerate for at least 4 hours or overnight. This chilling time is crucial for developing the perfect texture in your Loaded Brownie Cheesecake Cups.
- Step 6: Make the Ganache and Decorate Place chocolate chips in a heat-proof bowl. Heat the heavy cream in a small saucepan until it just begins to simmer, then pour over the chocolate chips. Let sit for 2 minutes, then whisk until smooth and glossy. Allow to cool for 5-10 minutes until slightly thickened but still pourable. Spoon the ganache over each chilled cheesecake cup, then add your desired toppings while the ganache is still soft. Return to the refrigerator until ready to serve.
Notes
Fresh ingredients will always yield the best flavor results.
Nutrition
- Serving Size: 1 cup
- Calories: 380
- Sugar: 26g
- Sodium: 320mg
- Fat: 25g
- Saturated Fat: 14g
- Unsaturated Fat: 9g
- Trans Fat: 0g
- Carbohydrates: 35g
- Fiber: 2g
- Protein: 6g
- Cholesterol: 110mg