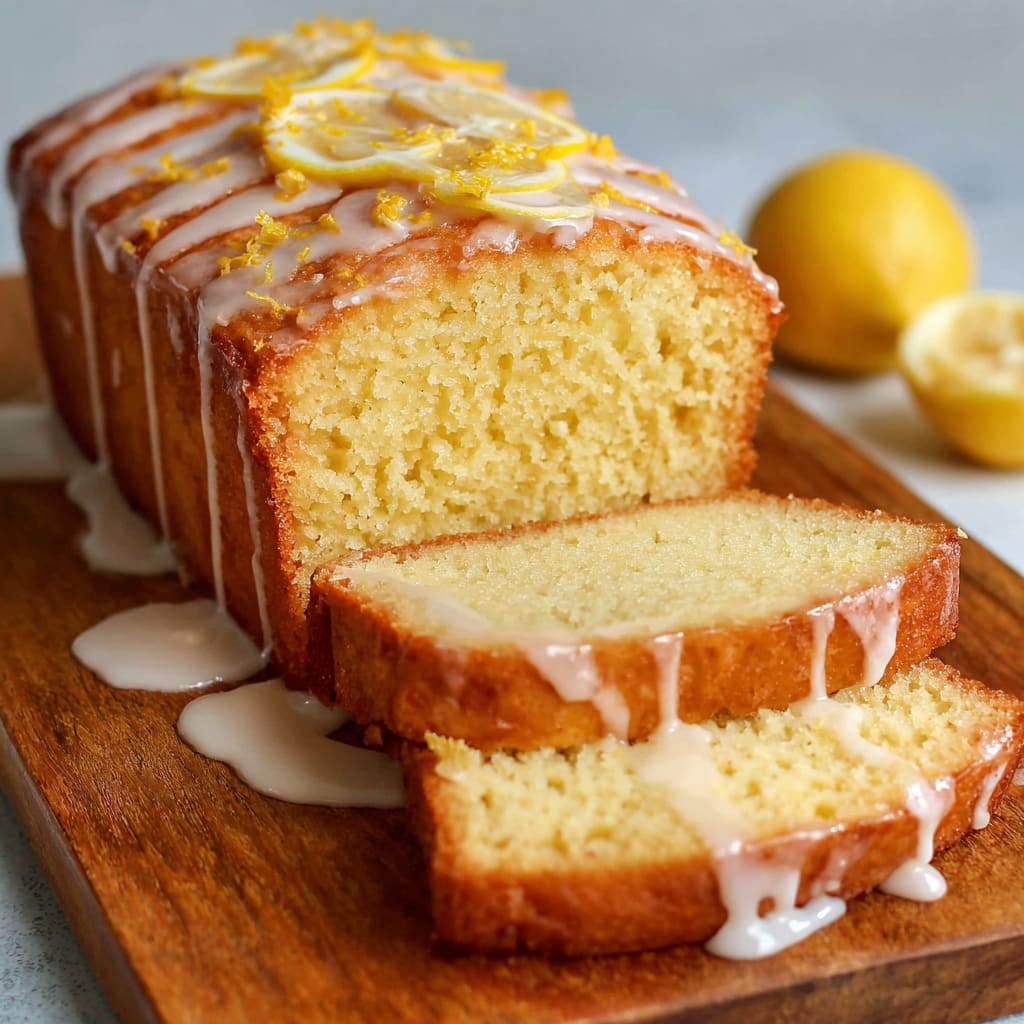
Bright, buttery, and bursting with citrus flavor, Classic Lemon Bars are the kind of dessert that stops you mid-bite. The contrast between the crumbly shortbread crust and the silky, tangy lemon filling is nothing short of magical. Classic lemon bars have earned their place as a timeless treat, beloved at picnics, holiday tables, and afternoon gatherings alike. Whether you’re a seasoned baker or just starting out, this recipe delivers consistent, bakery-quality results every single time. You’ll learn exactly how to make the perfect crust, a smooth lemon filling, and get expert tips to nail this recipe on your first try.
Why You’ll Love This Recipe
There are countless reasons to fall in love with these classic lemon bars. First, the flavor is extraordinary — the bright, tart lemon filling balances perfectly against the rich, buttery shortbread base. Every bite delivers a satisfying contrast of textures: crisp yet tender crust beneath a smooth, custard-like topping dusted in powdered sugar.
Second, this recipe is surprisingly simple. With just a handful of pantry staples and straightforward steps, even beginner bakers can achieve stunning results. No special equipment or advanced techniques are required.
Third, these lemon bars travel and store beautifully, making them ideal for meal prep, potlucks, or gifting. They firm up nicely in the refrigerator and slice into clean, picture-perfect bars. The combination of convenience, crowd-pleasing flavor, and elegant appearance makes this lemon bar recipe an absolute must-have in your baking repertoire.
Ingredients List for the Classic Lemon Bars
Gather these simple, fresh ingredients before you begin. Using room-temperature eggs and freshly squeezed lemon juice will make a noticeable difference in the final texture and flavor of your bars.
For the Crust:
• 1 and 3/4 cups (220 grams) all-purpose flour
• 1/4 cup (32 grams) cornstarch
• 1/2 cup (100 grams) granulated sugar
• 1/4 teaspoon salt
• 1 cup (230 grams) unsalted butter (, softened)
For the Lemon Filling:
• 1 1/2 cups (300 grams) granulated sugar
• 1/4 cup (32 grams) all-purpose flour
• 4 large eggs (, room temperature)
• 1/2 cup (120ml) fresh lemon juice
Pro Tips
1. Use Fresh Lemon Juice Only
Bottled lemon juice lacks the brightness and complexity that makes these lemon squares truly exceptional. Freshly squeezed juice delivers that bold, vibrant citrus flavor in every bite. For best results, juice your lemons just before mixing the filling.
2. Don’t Skip the Cooling Time
Patience is essential here. Allowing your classic lemon bars to cool completely at room temperature before refrigerating ensures the filling sets properly. Cutting into them too early results in a runny, unset center. Give them the full 1-2 hours on the wire rack, then at least two hours in the refrigerator.
3. Press the Crust Firmly and Evenly
An uneven crust bakes unevenly. Use the flat bottom of a measuring cup or glass to press the crust mixture into a uniform layer across the entire pan. This guarantees consistent texture and ensures the filling sits evenly on top.
Instructions
To make the crust:
Step 1: Preheat the oven to 350°F (177°C). Line a 9×13-inch baking pan with aluminum foil or parchment paper, making sure to leave some overhang for easy removal, and spray with nonstick cooking spray. Set aside.
Step 2: In a large mixing bowl, whisk together the flour, cornstarch, sugar, and salt.
Step 3: Cube the butter into smaller pieces and add to the dry ingredients. Using a pastry cutter (or your hands) cut the butter into the mixture until it’s crumbly and starts to come together.
Step 4: Scoop the mixture into the prepared baking pan and press it down into one even layer.
Step 5: Bake at 350°F (177°C) for 20-25 minutes, or just until the top is set and edges are lightly golden brown. Remove from the oven and set aside while you prepare the filling. Keep oven temperature at 350°F (177°C).
To make the lemon filling:
Step 1: In a large mixing bowl, whisk together the granulated sugar and flour. Add in the eggs and lemon juice and mix until fully combined. Pour the lemon filling over the warm crust and return to the oven.
Step 2: Bake for 18-22 minutes or until the lemon filling is set and no longer jiggles.
Step 3: Remove from the oven and transfer to a wire rack to cool completely for 1-2 hours, then cover tightly, and refrigerate for at least two hours. Sift powdered sugar on top, slice into bars, and enjoy!
Variations
Lemon Blueberry Bars
Scatter fresh blueberries over the warm crust before pouring the lemon filling on top. The berries sink slightly during baking and add a gorgeous burst of fruity flavor alongside the tart citrus.
Lime or Key Lime Bars
Swap the fresh lemon juice for an equal amount of fresh lime juice or key lime juice to create a tropical twist on this easy lemon bar recipe. The flavor profile becomes more floral and slightly more intense.
Meyer Lemon Bars
Replace standard lemon juice with Meyer lemon juice for a sweeter, more delicate citrus flavor. Meyer lemons are less acidic than regular lemons, producing a milder, honey-toned filling that is equally irresistible dusted in powdered sugar.
Storage and Serving
Storing Your Classic Lemon Bars
Store classic lemon bars in an airtight container in the refrigerator for up to 5 days. Place parchment paper between layers to prevent sticking. For longer storage, wrap individual bars tightly in plastic wrap and freeze for up to 3 months. Thaw overnight in the refrigerator before serving.
Serving Suggestions
For the cleanest slices, use a sharp knife wiped clean between each cut. Dust with powdered sugar just before serving rather than in advance, as the sugar can absorb moisture and disappear over time. These bars pair beautifully with fresh berries, whipped cream, or a scoop of vanilla ice cream. Serve chilled straight from the refrigerator for the best texture and flavor experience.
FAQs
1. Why is my lemon filling runny after baking?
The filling likely needed more baking time or was not chilled long enough. Make sure the filling no longer jiggles before removing from the oven, and refrigerate for a minimum of two full hours before slicing.
2. Can I make Classic Lemon Bars ahead of time?
Yes. These bars are actually better the next day after the filling has fully set overnight in the refrigerator, making them ideal for advance preparation.
3. Do I have to use cornstarch in the crust?
Cornstarch gives the shortbread crust its signature tender, melt-in-your-mouth texture. Omitting it will result in a denser, less delicate crust.
4. Can I use bottled lemon juice?
Fresh lemon juice is strongly recommended. Bottled juice lacks the vibrant flavor needed for authentic, bright-tasting lemon bars.
5. How do I know when the lemon filling is fully set?
Gently shake the pan. The filling should have only a very slight wobble in the very center. It will firm up completely during the chilling process in the refrigerator.

Classic Lemon Bars
- Prep Time: 15 mins
- Cook Time: 30 mins
- Total Time: 45 mins
- Yield: 4 people 1x
- Category: Dessert
- Method: Cooking
- Cuisine: American
Description
Indulge in the sweet and tangy goodness of Classic Lemon Bars. Discover the perfect recipe for a delightful treat. Try it now!
Ingredients
- 1 and 3/4 cups (220 grams) all-purpose flour
- 1/4 cup (32 grams) cornstarch
- 1/2 cup (100 grams) granulated sugar
- 1/4 teaspoon salt
- 1 cup (230 grams) unsalted butter (, softened)
- 1 1/2 cups (300 grams) granulated sugar
- 1/4 cup (32 grams) all-purpose flour
- 4 large eggs (, room temperature)
- 1/2 cup (120ml) fresh lemon juice
Instructions
To make the crust:
- Step 1: Preheat the oven to 350°F (177°C). Line a 9×13-inch baking pan with aluminum foil or parchment paper, making sure to leave some overhang for easy removal, and spray with nonstick cooking spray. Set aside.
- Step 2: In a large mixing bowl, whisk together the flour, cornstarch, sugar, and salt.
- Step 3: Cube the butter into smaller pieces and add to the dry ingredients. Using a pastry cutter (or your hands) cut the butter into the mixture until it’s crumbly and starts to come together.
- Step 4: Scoop the mixture into the prepared baking pan and press it down into one even layer.
- Step 5: Bake at 350°F (177°C) for 20-25 minutes, or just until the top is set and edges are lightly golden brown. Remove from the oven and set aside while you prepare the filling. Keep oven temperature at 350°F (177°C).
To make the lemon filling:
- Step 1: In a large mixing bowl, whisk together the granulated sugar and flour. Add in the eggs and lemon juice and mix until fully combined. Pour the lemon filling over the warm crust and return to the oven.
- Step 2: Bake for 18-22 minutes or until the lemon filling is set and no longer jiggles.
- Step 3: Remove from the oven and transfer to a wire rack to cool completely for 1-2 hours, then cover tightly, and refrigerate for at least two hours. Sift powdered sugar on top, slice into bars, and enjoy!
Notes
Try This Recipe and Leave a comment Below, your opinion matters to me!
Nutrition
- Serving Size: 4 serving
- Calories: 400
- Sugar: 5g
- Sodium: 400mg
- Fat: 10g
- Saturated Fat: 3g
- Unsaturated Fat: 7g
- Trans Fat: 0g
- Carbohydrates: 40g
- Fiber: 5g
- Protein: 15g
- Cholesterol: 50mg