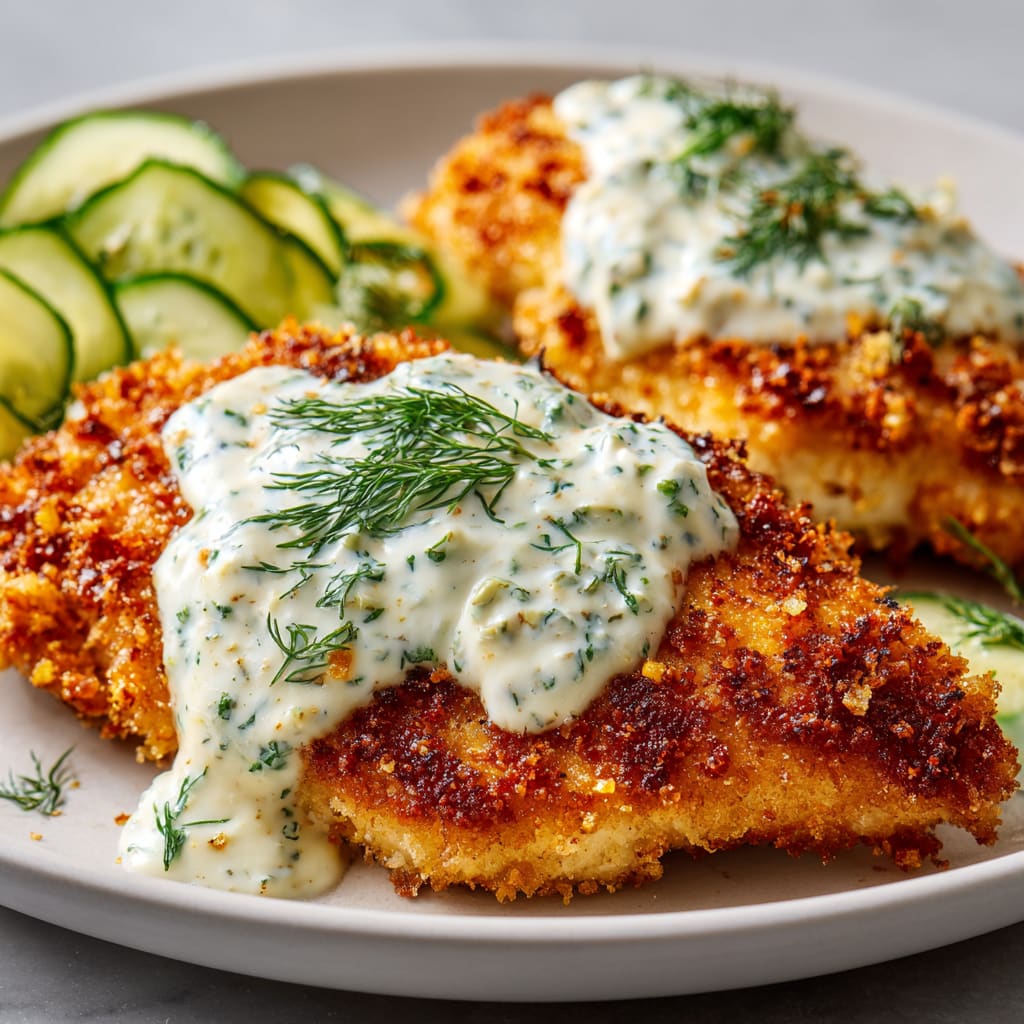
Imagine biting into perfectly juicy chicken encased in a golden, crackling crust with surprising notes of tangy dill pickle and savory Parmesan cheese. This Crispy Dill Pickle Parmesan Chicken is a flavor explosion that transforms ordinary chicken breasts into a crave-worthy meal your family will request again and again. The pickle brine tenderizes the meat while infusing it with that distinctive dill flavor, creating chicken that’s moist on the inside and irresistibly crunchy on the outside. You’ll learn how to achieve the perfect pickle-infused chicken with a coating that stays put and crisps up beautifully, plus variations to keep this versatile dish in your regular rotation.
Why You’ll Love This Recipe
This Crispy Dill Pickle Parmesan Chicken will quickly become your new go-to dinner for so many reasons. First, the unexpected combination of dill pickle brine and Parmesan creates a flavor profile that’s simultaneously familiar and exciting – tangy, savory, and utterly addictive. The contrast between the juicy, tender chicken interior and the crispy, textured exterior makes each bite satisfyingly complex.
What makes this pickle chicken particularly special is how the brining process naturally tenderizes the meat, ensuring it stays moist even if you accidentally overcook it slightly. The Parmesan in the breading doesn’t just add flavor – it creates extra crispy edges as it melts and caramelizes during cooking.
Best of all, this recipe transforms humble ingredients you likely already have in your refrigerator and pantry into a restaurant-worthy meal. It’s perfect for hectic weeknights since the active preparation time is minimal, and you can even brine the chicken ahead of time for an even faster dinner assembly.
Ingredients List for the Crispy Dill Pickle Parmesan Chicken
The magic of this dish comes from the perfect balance of tangy pickle brine, savory cheese, and crispy coating elements that work together to create layers of flavor:
– 4 chicken breasts, boneless and skinless
– 1 cup dill pickle juice
– 1 cup breadcrumbs (preferably seasoned)
– ½ cup grated Parmesan cheese
– 2 large eggs
– ½ cup all-purpose flour
– 1 teaspoon garlic powder
– 1 teaspoon onion powder
– ½ teaspoon paprika
– Salt and pepper to taste
– Cooking oil (for frying)
Pro Tips
To elevate your Crispy Dill Pickle Parmesan Chicken from good to spectacular, follow these three critical techniques:
First, don’t rush the brining process. While 30 minutes is the minimum, allowing the chicken to marinate in the pickle juice for up to 4 hours will significantly enhance both tenderness and flavor penetration. The acidity in the brine works magic on the protein structure, creating chicken that’s juicier and more flavorful throughout.
Second, maintain proper oil temperature during frying. Too hot, and your breading will burn before the chicken cooks through; too cool, and the coating will absorb excess oil and become soggy. The ideal temperature is around 350°F (175°C). If you don’t have a thermometer, watch for that gentle sizzle when a breadcrumb hits the oil – not a violent bubble, but a steady cooking action.
Finally, perfect your breading technique by using one hand for wet ingredients and one for dry. This prevents the dreaded “breading fingers” where coating builds up on your hands and makes the process messier than necessary. After coating each piece, press the breadcrumb mixture gently into the chicken to ensure it adheres well for maximum crispiness.
Instructions
Creating Crispy Dill Pickle Parmesan Chicken is simpler than you might think. Just follow these easy steps:
Step 1: In a large bowl, combine the chicken breasts and dill pickle juice. Ensure the chicken is fully submerged and allow it to marinate in the refrigerator for at least 30 minutes.
Step 2: Set up a three-bowl breading station. In the first bowl, place the flour seasoned with salt, pepper, and garlic powder. In the second bowl, whisk together the eggs. In the third bowl, mix the breadcrumbs and grated Parmesan cheese.
Step 3: In a large skillet, heat enough oil over medium heat to cover the bottom. Monitor the temperature; the oil should sizzle when you drop in a breadcrumb.
Step 4: Remove each chicken breast from the marinade, shaking off any excess juice. Dredge it in the seasoned flour first, then dip it into the egg mixture, and finally coat it with the breadcrumb-Parmesan mixture.
Step 5: Carefully place the breaded chicken breasts into the hot oil. Fry them for about 5-7 minutes per side or until they turn a golden brown and reach an internal temperature of 165°F (75°C). Avoid overcrowding the pan to ensure even cooking.
Step 6: Drain Excess Oil: Once cooked, transfer the chicken to a plate lined with paper towels to absorb the excess oil.
Step 7: Rest the Chicken: Allow the chicken to rest for 5-10 minutes. This will help retain its juices and ensure it remains tender.
Step 8: Serve or Store: Enjoy the chicken immediately, or let it cool before storing it in an airtight container for future meals. Following these steps will guide you in creating perfectly crispy and flavorful chicken that will become a favorite in your household.
Variations
The beauty of Crispy Dill Pickle Parmesan Chicken is its adaptability. Try these popular variations to keep the recipe exciting:
For a healthier version, skip the frying and make Baked Pickle Parmesan Chicken instead. After breading, place the chicken on a wire rack over a baking sheet, spray with cooking oil, and bake at 425°F (220°C) for 20-25 minutes until golden and cooked through. You’ll still get impressive crispiness with significantly less oil.
Create Spicy Dill Pickle Chicken by adding 1-2 teaspoons of cayenne pepper or hot sauce to your breadcrumb mixture. The heat pairs wonderfully with the tangy pickle flavor, creating a more complex taste profile that spice lovers will appreciate.
For a gluten-free pickle chicken option, substitute the all-purpose flour with almond flour and use gluten-free breadcrumbs or crushed pork rinds for the coating. This variation maintains the crispy exterior while accommodating dietary restrictions without sacrificing the distinctive dill pickle flavor.
Storage and Serving
Crispy Dill Pickle Parmesan Chicken maintains its quality when properly stored. Refrigerate leftovers in an airtight container for up to 3 days. To reheat while preserving the crispy coating, avoid the microwave; instead, place the chicken on a wire rack in a 350°F (175°C) oven for 10-15 minutes until heated through.
For serving, this versatile chicken shines as the centerpiece of several meals. Create a restaurant-worthy presentation by slicing the chicken and fanning it over a bed of creamy mashed potatoes or buttery egg noodles, with a side of roasted vegetables for color and nutrition.
Transform it into a spectacular sandwich by placing a whole breast on a brioche bun with lettuce, tomato, and a pickle-infused mayo (mix mayonnaise with a tablespoon of pickle juice and chopped dill pickles). For a lighter option, slice the chicken and add it to a crisp green salad with a tangy vinaigrette that complements the pickle flavors.
FAQs
Can I use chicken thighs instead of breasts?
Absolutely! Chicken thighs work wonderfully in this recipe and often result in juicier meat. Adjust cooking time slightly as thighs may take a bit longer to reach the safe internal temperature of 165°F.
What if I don’t have enough pickle juice?
If you’re short on pickle juice, you can supplement with a mixture of vinegar, water, and dill. Combine ½ cup white vinegar, ½ cup water, and 1 tablespoon dried dill as a substitute.
Can I make this ahead for a party?
Yes! Brine the chicken up to 24 hours ahead, and you can even bread it a few hours before cooking. For best results when serving a crowd, fry the chicken, then keep it warm in a 250°F oven on a wire rack over a baking sheet.
Why is my breading falling off during cooking?
This typically happens if the oil isn’t hot enough or if you flip the chicken too soon. Ensure your oil is properly heated and let the first side form a solid crust (about 3-4 minutes) before attempting to flip.
Can I use this recipe to make pickle-flavored chicken tenders?
Definitely! Cut chicken breasts into strips before brining, reduce the cooking time to about 3-4 minutes per side, and you’ll have delicious dill pickle chicken tenders that make perfect appetizers or kid-friendly meals.

Crispy Dill Pickle Parmesan Chicken
- Prep Time: 15 mins
- Cook Time: 30 mins
- Total Time: 45 mins
- Yield: 4 people 1x
- Category: Dinner
- Method: Cooking
- Cuisine: American
Description
Discover the secret to making Crispy Dill Pickle Parmesan Chicken with this easy recipe. Try it today!
Ingredients
- 4 chicken breasts, boneless and skinless
- 1 cup dill pickle juice
- 1 cup breadcrumbs (preferably seasoned)
- ½ cup grated Parmesan cheese
- 2 large eggs
- ½ cup all-purpose flour
- 1 teaspoon garlic powder
- 1 teaspoon onion powder
- ½ teaspoon paprika
- Salt and pepper to taste
- Cooking oil (for frying)
Instructions
- Step 1: Creating Crispy Dill Pickle Parmesan Chicken is simpler than you might think. Just follow these easy steps:.
- Step 2: In a large bowl, combine the chicken breasts and dill pickle juice. Ensure the chicken is fully submerged and allow it to marinate in the refrigerator for at least 30 minutes.
- Step 3: Set up a three-bowl breading station. In the first bowl, place the flour seasoned with salt, pepper, and garlic powder. In the second bowl, whisk together the eggs. In the third bowl, mix the breadcrumbs and grated Parmesan cheese.
- Step 4: In a large skillet, heat enough oil over medium heat to cover the bottom. Monitor the temperature; the oil should sizzle when you drop in a breadcrumb.
- Step 5: Remove each chicken breast from the marinade, shaking off any excess juice. Dredge it in the seasoned flour first, then dip it into the egg mixture, and finally coat it with the breadcrumb-Parmesan mixture.
- Step 6: Carefully place the breaded chicken breasts into the hot oil. Fry them for about 5-7 minutes per side or until they turn a golden brown and reach an internal temperature of 165°F (75°C). Avoid overcrowding the pan to ensure even cooking.
- Step 7: P id=”instruction-step-7″>Step 6: Drain Excess Oil: Once cooked, transfer the chicken to a plate lined with paper towels to absorb the excess oil.
- Step 8: P id=”instruction-step-8″>Step 7: Rest the Chicken: Allow the chicken to rest for 5-10 minutes. This will help retain its juices and ensure it remains tender.
- Step 9: P id=”instruction-step-9″>Step 8: Serve or Store: Enjoy the chicken immediately, or let it cool before storing it in an airtight container for future meals. Following these steps will guide you in creating perfectly crispy and flavorful chicken that will become a favorite in your household.
Notes
Try This Recipe and Leave a comment Below, your opinion matters to me!
Nutrition
- Serving Size: 4 serving
- Calories: 400
- Sugar: 5g
- Sodium: 400mg
- Fat: 10g
- Saturated Fat: 3g
- Unsaturated Fat: 7g
- Trans Fat: 0g
- Carbohydrates: 40g
- Fiber: 5g
- Protein: 15g
- Cholesterol: 50mg