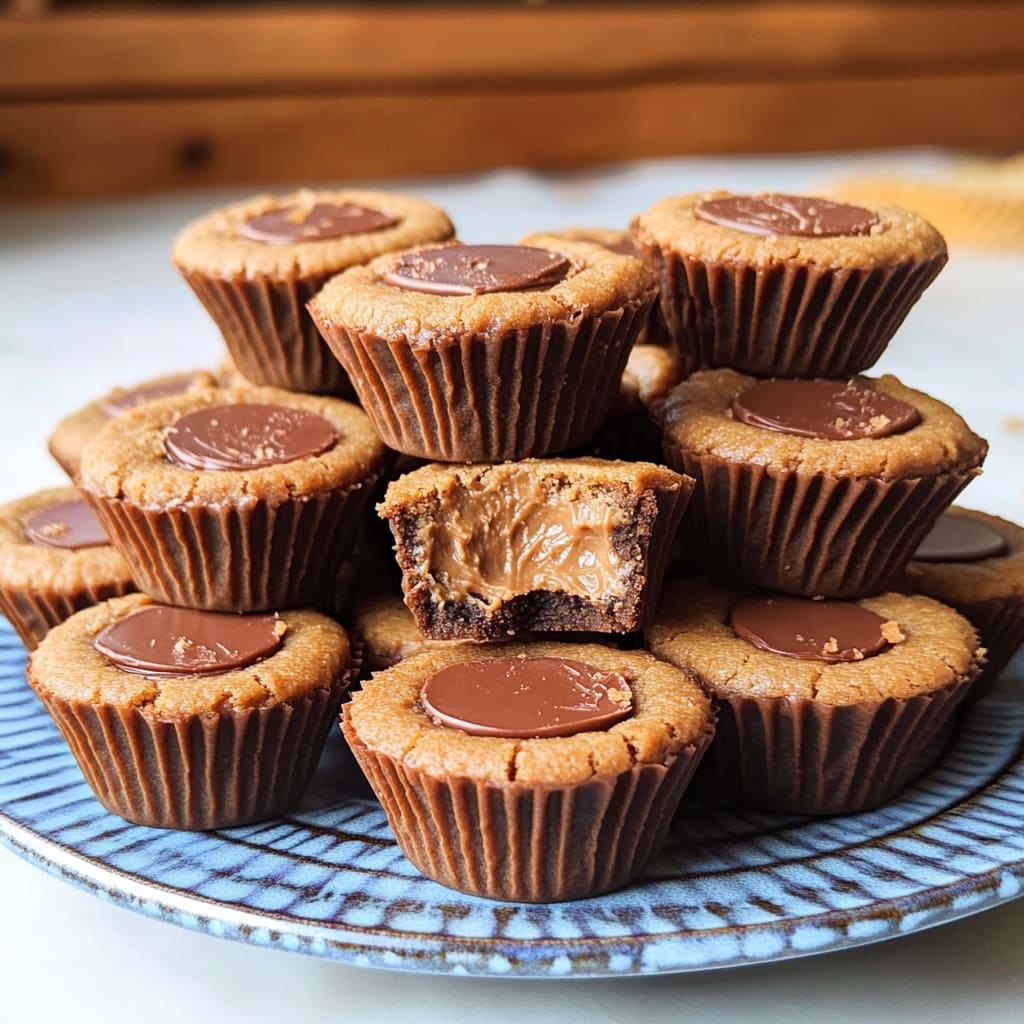
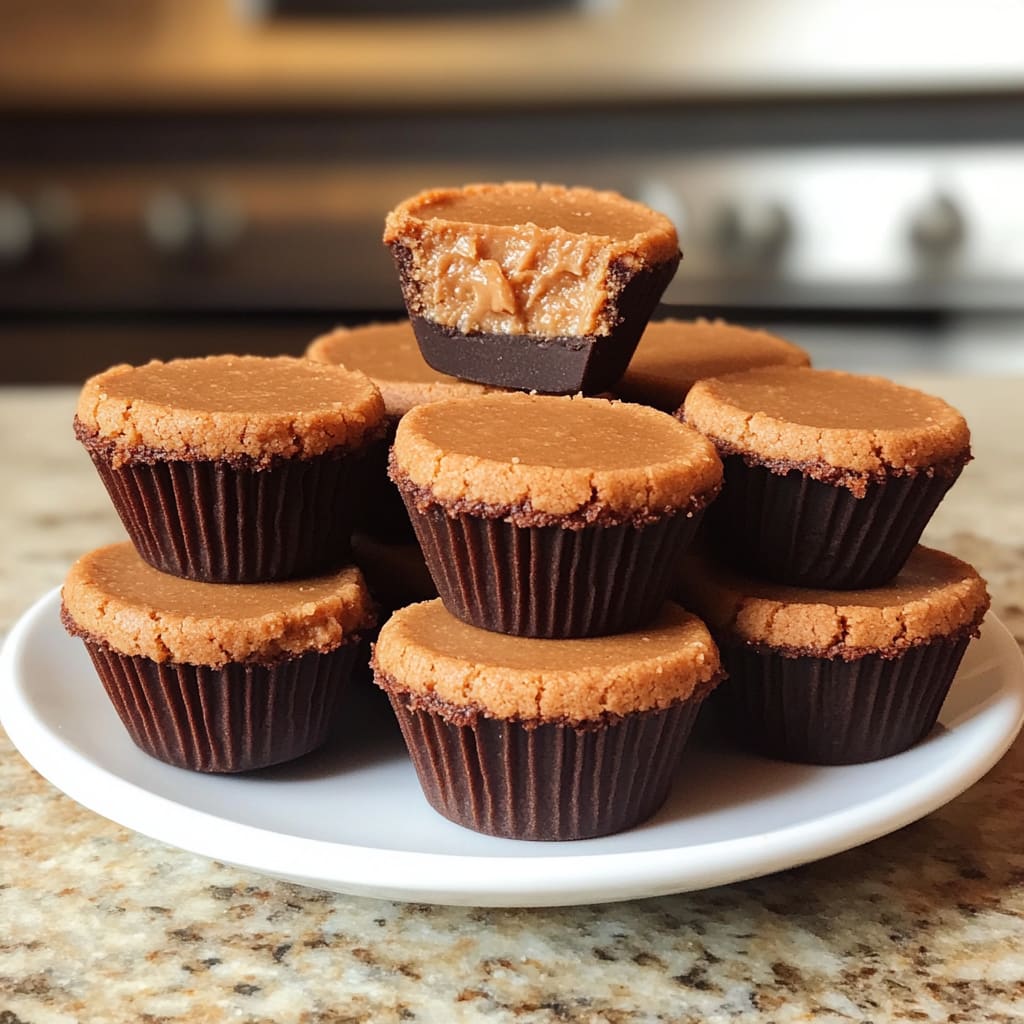
Imagine biting into a warm, buttery cookie shell only to discover a decadent pool of creamy peanut butter waiting inside. These irresistible Peanut Butter Cookie Cups combine the perfect balance of sweet, salty, and utterly indulgent flavors that will have everyone reaching for seconds. The contrast between the crisp cookie exterior and the smooth, melt-in-your-mouth peanut butter center creates a dessert that’s impossible to resist. You’ll learn how to create these showstopping Peanut Butter Cookie Cups with simple ingredients and foolproof techniques that guarantee success every time.
Why You’ll Love This Recipe
These Peanut Butter Cookie Cups are about to become your new favorite treat for so many reasons. First, they offer that perfect textural contrast between the slightly crisp, buttery cookie exterior and the luscious, creamy peanut butter filling that creates a truly memorable dessert experience. Unlike traditional peanut butter cookies, these cups deliver a concentrated burst of peanut butter flavor in every bite.
They’re also incredibly versatile – perfect for holiday cookie exchanges, bake sales, or as an everyday treat that elevates your dessert game. The recipe comes together with pantry staples you likely already have on hand, making them an easy go-to when the sweet tooth strikes. Plus, they look impressive despite being surprisingly simple to make, giving you maximum flavor payoff with minimal effort.
The best part? These delightful peanut butter cookie treats can be made ahead of time, making them perfect for busy schedules or when you need a reliable dessert that’s guaranteed to impress guests without keeping you stuck in the kitchen.
Ingredients
For the Cookie Cups:
- 1 cup (226g) unsalted butter, softened
- 3/4 cup (150g) granulated sugar
- 3/4 cup (165g) packed brown sugar
- 2 large eggs, room temperature
- 1 teaspoon vanilla extract
- 2 1/2 cups (300g) all-purpose flour
- 1 teaspoon baking soda
- 1/2 teaspoon salt
For the Peanut Butter Filling:
- 1 cup (250g) creamy peanut butter (use a commercial brand like Jif or Skippy for best results)
- 1/2 cup (60g) powdered sugar
- 2 tablespoons unsalted butter, softened
- 1/2 teaspoon vanilla extract
- 1/4 teaspoon salt (omit if using salted peanut butter)
The key to these delicious peanut butter filled cookie cups is using a good quality peanut butter that’s creamy but not too runny. Natural peanut butters can separate and affect the filling’s consistency, so stick with commercial varieties for this recipe.
Pro Tips
Use Room Temperature Ingredients: For the perfect cookie cup texture, ensure your butter and eggs are at room temperature before mixing. Cold ingredients won’t incorporate properly, resulting in dense cups that don’t hold their shape. Set ingredients out about 30 minutes before beginning.
Create Perfect Cups Every Time: When pressing the indentations into your warm cookie cups, use the back of a measuring teaspoon or a specialized cookie cup tool. Work quickly while the cookies are still warm (about 1-2 minutes after removing from the oven), as this is when they’re most pliable. If the cookies cool too much, return the pan to the oven for 30 seconds to soften them slightly.
Filling Consistency Matters: The ideal peanut butter filling should be firm enough to hold its shape but soft enough to be creamy when bitten into. Achieve this perfect consistency by beating the filling ingredients until completely smooth, then chilling for 15 minutes before filling your cups. This brief chilling time makes the filling easier to work with while ensuring it sets up properly in the finished Peanut Butter Cookie Cups.
Instructions
Step 1: Prepare Your Equipment
Preheat your oven to 350°F (175°C) and generously grease a 24-cup mini muffin tin with cooking spray or butter. This ensures your cookie cups will release easily after baking. If you have two muffin tins, prepare both as this recipe makes approximately 36 cookie cups.
Step 2: Make the Cookie Dough
In a large bowl, cream together the softened butter, granulated sugar, and brown sugar until light and fluffy, about 3-4 minutes. Don’t rush this step—proper creaming incorporates air for the perfect cookie texture. Add eggs one at a time, beating well after each addition, then mix in the vanilla extract until combined.
Step 3: Add Dry Ingredients
In a separate bowl, whisk together the flour, baking soda, and salt. Gradually add this dry mixture to your wet ingredients, mixing on low speed just until combined. Be careful not to overmix, which can make your cookie cups tough rather than tender.
Step 4: Form and Bake the Cups
Roll the dough into 1-inch balls (about 1 tablespoon each) and place one ball in each cup of your prepared muffin tin. Don’t press them down—they’ll naturally form into cups during baking. Bake for 10-12 minutes, until the edges are just turning golden brown but the centers still look slightly underdone.
Step 5: Create the Cup Indentations
Remove the muffin tin from the oven and immediately use the back of a measuring teaspoon to press down in the center of each cookie, creating a cup shape. Press firmly but gently to create a good-sized cavity without cracking the sides. Let the cookie cups cool in the pan for 5 minutes, then carefully transfer to a wire rack to cool completely.
Step 6: Prepare the Peanut Butter Filling
While the cookie cups cool, make your filling. In a medium bowl, beat together the peanut butter, powdered sugar, softened butter, vanilla, and salt until smooth and creamy. Transfer the mixture to a piping bag fitted with a star tip, or use a ziplock bag with the corner snipped off for easy filling.
Step 7: Fill and Finish
Once the cookie cups are completely cool, pipe the peanut butter filling into each cup, creating a small mound on top. For an extra special touch, sprinkle with a few mini chocolate chips or a light dusting of powdered sugar. Let the filled Peanut Butter Cookie Cups set for about 30 minutes before serving for the best texture experience.
Variations
Chocolate Peanut Butter Cookie Cups: Add 1/4 cup of cocoa powder to the cookie dough and reduce the flour by the same amount. For an even more decadent treat, drizzle melted chocolate over the filled cups or press a chocolate kiss into the peanut butter filling while it’s still soft.
Jelly-Filled Peanut Butter Cookie Cups: Create the ultimate PB&J experience by adding a small amount of grape or strawberry jelly in the center of the peanut butter filling. Simply pipe a ring of peanut butter filling around the edge of each cup, then add a small dollop of jelly in the center for a delightful surprise.
Vegan Peanut Butter Cookie Cups: Replace butter with vegan butter, eggs with flax eggs (1 tablespoon ground flaxseed mixed with 3 tablespoons water per egg), and use dairy-free peanut butter. These peanut butter thumbprint cookies with the vegan twist will satisfy plant-based eaters without sacrificing any of the classic peanut butter cookie cup flavor.
Storage and Serving
These Peanut Butter Cookie Cups will keep beautifully in an airtight container at room temperature for up to 3 days. For longer storage, refrigerate for up to a week, though the cookie portion may soften slightly. You can also freeze the unfilled cookie cups for up to 3 months – simply thaw at room temperature and add the filling before serving.
For an elevated dessert experience, serve these cookie cups slightly warmed (about 10 seconds in the microwave) with a scoop of vanilla ice cream on the side. The contrast between the warm cookie, creamy peanut butter, and cold ice cream creates an irresistible combination.
For a stunning presentation at parties, arrange the Peanut Butter Cookie Cups on a tiered serving platter, alternating with other small desserts like chocolate truffles or fresh berries. They also make charming additions to dessert charcuterie boards or as the star of a peanut butter-themed dessert table alongside peanut butter brownies and cookies.
FAQs
Why did my cookie cups crack when I made the indentations?
If your cups crack, you likely waited too long after baking to make the indentations. Press the centers down immediately after removing from the oven while they’re still soft and pliable.
Can I use crunchy peanut butter instead of creamy?
Yes, crunchy peanut butter works fine if you prefer some texture in your filling. The small peanut pieces will add a pleasant crunch to your Peanut Butter Cookie Cups.
My peanut butter filling is too runny. How can I fix it?
Add more powdered sugar, 1 tablespoon at a time, until you reach the desired consistency. If it becomes too sweet, balance with a tiny pinch of salt.
Can I make these ahead for a party?
Absolutely! Prepare the cookie cups up to 3 days in advance and store in an airtight container. For maximum freshness, fill them the day of your event.
How do I know when the cookie cups are done baking?
The edges should be just turning golden brown while the centers still look slightly underdone. Don’t overbake, as they’ll continue cooking in the hot pan and need to be soft enough to form the cup indentation.
Conclusion
These Peanut Butter Cookie Cups are comfort food at its finest — a perfect marriage of buttery cookie and creamy peanut butter that creates an irresistible handheld treat. They’re the kind of dessert that turns ordinary moments into special occasions, whether enjoyed with afternoon coffee or served as the crowning glory of a holiday dessert table. With their perfect balance of textures and that classic peanut butter flavor everyone loves, these little cups of joy are bound to become a staple in your baking repertoire. So preheat that oven, grab your mixing bowl, and get ready to create a batch of pure bliss!
Print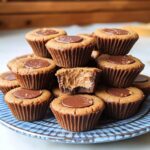
Peanut Butter Cookie Cups
- Prep Time: 20 minutes
- Cook Time: 12 minutes
- Total Time: 32 minutes
- Yield: 36 cookie cups 1x
- Category: Dessert
- Method: Baking
- Cuisine: Americaine
Description
Peanut Butter Cookie Cups: Irresistible mini treats filled with creamy peanut butter goodness. Quick, comforting, and perfect for pleasing a crowd.
Ingredients
- 1 cup (226g) unsalted butter, softened
- 3/4 cup (150g) granulated sugar
- 3/4 cup (165g) packed brown sugar
- 2 large eggs, room temperature
- 1 teaspoon vanilla extract
- 2 1/2 cups (300g) all-purpose flour
- 1 teaspoon baking soda
- 1/2 teaspoon salt
- 1 cup (250g) creamy peanut butter (use a commercial brand like Jif or Skippy for best results)
- 1/2 cup (60g) powdered sugar
- 2 tablespoons unsalted butter, softened
- 1/2 teaspoon vanilla extract
- 1/4 teaspoon salt (omit if using salted peanut butter)
Instructions
- Step 1: Prepare Your Equipment Preheat your oven to 350°F (175°C) and generously grease a 24-cup mini muffin tin with cooking spray or butter. This ensures your cookie cups will release easily after baking. If you have two muffin tins, prepare both as this recipe makes approximately 36 cookie cups.
- Step 2: Make the Cookie Dough In a large bowl, cream together the softened butter, granulated sugar, and brown sugar until light and fluffy, about 3-4 minutes. Don’t rush this step—proper creaming incorporates air for the perfect cookie texture. Add eggs one at a time, beating well after each addition, then mix in the vanilla extract until combined.
- Step 3: Add Dry Ingredients In a separate bowl, whisk together the flour, baking soda, and salt. Gradually add this dry mixture to your wet ingredients, mixing on low speed just until combined. Be careful not to overmix, which can make your cookie cups tough rather than tender.
- Step 4: Form and Bake the Cups Roll the dough into 1-inch balls (about 1 tablespoon each) and place one ball in each cup of your prepared muffin tin. Don’t press them down—they’ll naturally form into cups during baking. Bake for 10-12 minutes, until the edges are just turning golden brown but the centers still look slightly underdone.
- Step 5: Create the Cup Indentations Remove the muffin tin from the oven and immediately use the back of a measuring teaspoon to press down in the center of each cookie, creating a cup shape. Press firmly but gently to create a good-sized cavity without cracking the sides. Let the cookie cups cool in the pan for 5 minutes, then carefully transfer to a wire rack to cool completely.
- Step 6: Prepare the Peanut Butter Filling While the cookie cups cool, make your filling. In a medium bowl, beat together the peanut butter, powdered sugar, softened butter, vanilla, and salt until smooth and creamy. Transfer the mixture to a piping bag fitted with a star tip, or use a ziplock bag with the corner snipped off for easy filling.
- Step 7: Fill and Finish Once the cookie cups are completely cool, pipe the peanut butter filling into each cup, creating a small mound on top. For an extra special touch, sprinkle with a few mini chocolate chips or a light dusting of powdered sugar. Let the filled Peanut Butter Cookie Cups set for about 30 minutes before serving for the best texture experience.
Notes
Fresh ingredients will always yield the best flavor results.
Nutrition
- Serving Size: 1 cookie cup
- Calories: 180 calories
- Sugar: 11g
- Sodium: 140mg
- Fat: 10g
- Saturated Fat: 4g
- Unsaturated Fat: 5g
- Trans Fat: 0g
- Carbohydrates: 20g
- Fiber: 1g
- Protein: 3g
- Cholesterol: 20mg