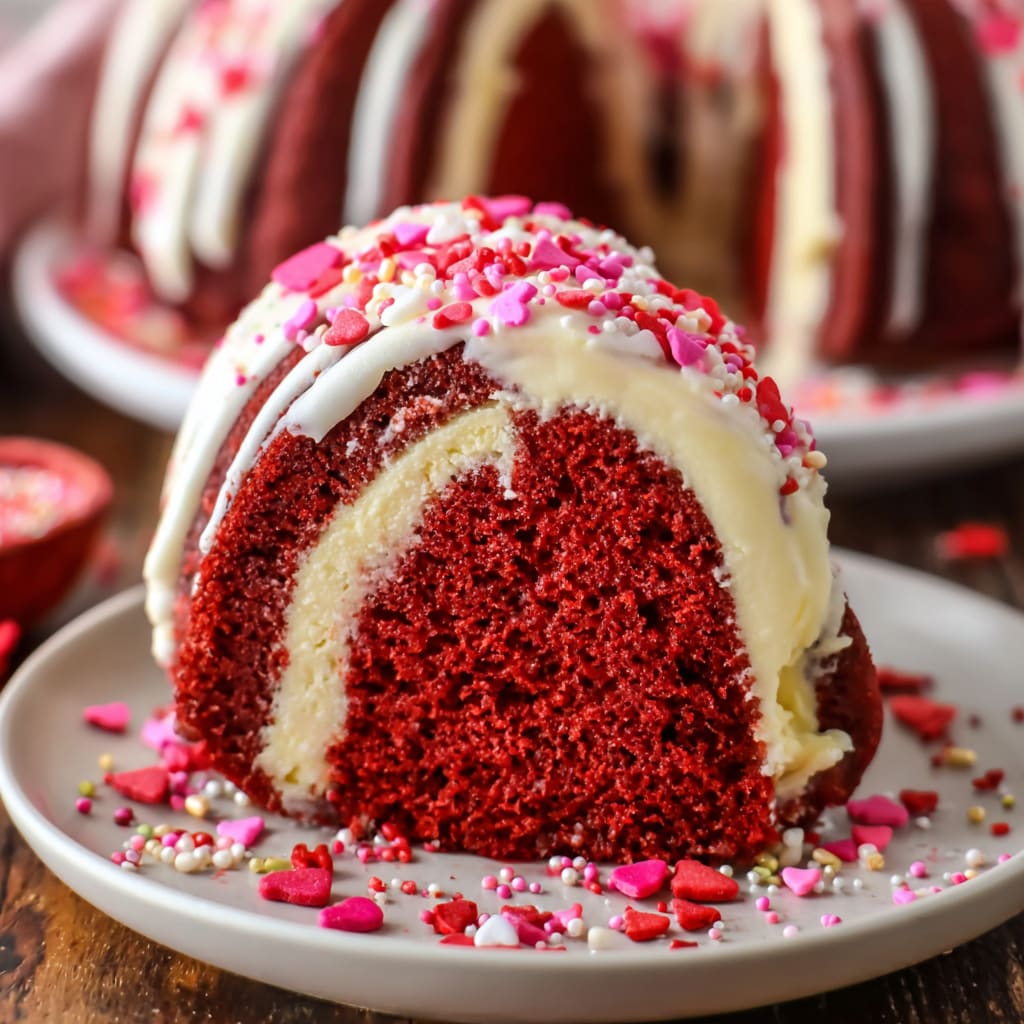
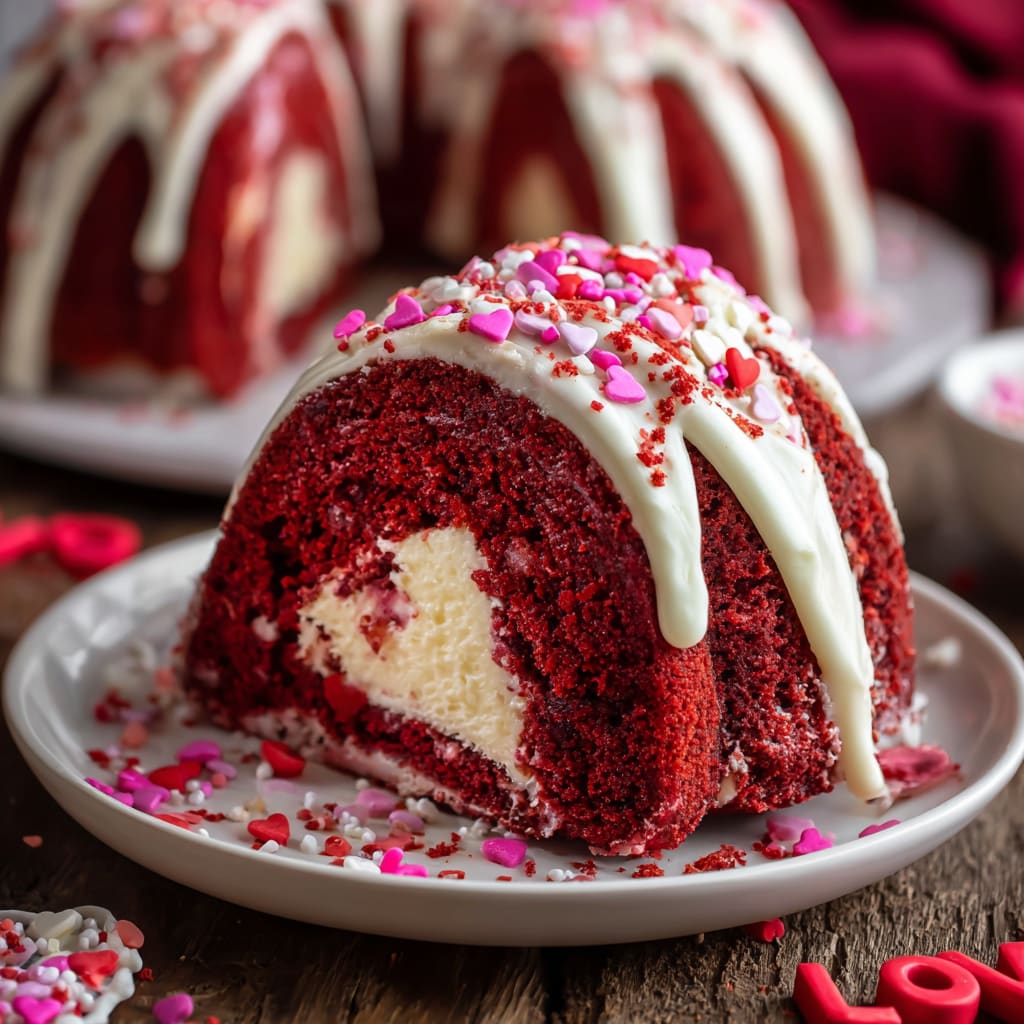
The velvety smoothness of a perfect Red Velvet Cream Cheese Bundt Cake creates an irresistible first impression that promises pure indulgence with every bite. This stunning dessert combines the subtle cocoa notes of traditional red velvet with a luscious cream cheese filling that creates a beautiful marble effect throughout the cake. Whether you’re celebrating a special occasion or simply craving something extraordinary, this Red Velvet Cream Cheese Bundt Cake delivers both impressive visual appeal and exceptional flavor. You’ll learn how to create bakery-quality results with straightforward techniques that ensure a moist, tender crumb and that signature crimson hue that makes red velvet so distinctive.
Why You’ll Love This Recipe
This Red Velvet Cream Cheese Bundt Cake stands out as a showstopper dessert that’s surprisingly approachable for home bakers of all skill levels. The contrast between the deep ruby-colored cake and the tangy cream cheese swirl creates a beautiful marbled effect that slices like a dream. What makes this recipe truly special is the perfect balance of textures – the cake itself maintains a tender, moist crumb while the cream cheese layer adds a silky richness that melts in your mouth.
The subtle chocolate notes from the cocoa powder harmonize perfectly with the slight tanginess of buttermilk and cream cheese, creating a sophisticated flavor profile that’s not overly sweet. Unlike many red velvet recipes that can turn out dry, this bundt version stays incredibly moist for days thanks to the careful ratio of wet to dry ingredients.
The visual impact of this dessert is undeniable – the dramatic red cake with white cream cheese swirls set against the beautiful curves of a bundt pan creates a presentation that looks professional with minimal effort. It’s the kind of dessert that draws gasps when brought to the table but requires no specialized baking skills to master.
Ingredients
For the Red Velvet Cake:
- 2½ cups (310g) all-purpose flour
- 2 tablespoons (12g) unsweetened cocoa powder
- 1 teaspoon baking soda
- ½ teaspoon salt
- ½ cup (115g) unsalted butter, softened
- 1½ cups (300g) granulated sugar
- 2 large eggs, at room temperature
- 1 cup (240ml) buttermilk, at room temperature
- 2 tablespoons (30ml) liquid red food coloring
- 1 teaspoon white vinegar
- 1 teaspoon vanilla extract
For the Cream Cheese Filling:
- 8 oz (225g) cream cheese, softened
- ¼ cup (50g) granulated sugar
- 1 large egg
- 1 teaspoon vanilla extract
For the Cream Cheese Glaze:
- 4 oz (113g) cream cheese, softened
- 1 cup (120g) powdered sugar
- 3-4 tablespoons (45-60ml) milk
- ½ teaspoon vanilla extract
The quality of cocoa powder significantly impacts the final flavor – use a high-quality Dutch-processed variety for best results. The buttermilk is essential for both the tender crumb and the slight tanginess that defines authentic red velvet cake. For the most vibrant color, gel food coloring provides intense hue without adding excessive liquid to the batter.
Pro Tips
Perfect Bundt Pan Preparation
The single most important step for bundt cake success is proper pan preparation. Thoroughly grease every crevice of your bundt pan, then dust lightly with flour, tapping out any excess. For this Red Velvet Cream Cheese Bundt Cake, use a baking spray containing flour for easiest release. Apply it immediately before filling the pan, as some sprays can slide down the sides if left to sit. This meticulous preparation ensures your cake releases cleanly, preserving the beautiful design.
Mastering the Cream Cheese Swirl
For the perfect marble effect, avoid overmixing the cream cheese filling into the batter. Drop spoonfuls of the cream cheese mixture over the red velvet batter, then use a knife to create gentle figure-eight motions through both batters. Limit yourself to 5-6 passes to maintain distinct swirls rather than a fully blended mixture. This restraint creates those beautiful contrasting streaks when the cake is sliced.
Temperature Control for Optimal Texture
Both room temperature ingredients and proper cooling are critical for Red Velvet Cream Cheese Bundt Cake success. Allow eggs, buttermilk, and butter to sit at room temperature for at least 30 minutes before mixing to ensure proper emulsion. After baking, resist the urge to unmold immediately. Allow the cake to cool in the pan for exactly 15 minutes – this timing prevents sticking while maintaining structural integrity when unmolded.
Instructions
Step 1: Prepare Your Equipment
Preheat your oven to 325°F (165°C). Thoroughly grease a 10-12 cup bundt pan with baking spray containing flour, ensuring you coat all crevices. In a medium bowl, whisk together flour, cocoa powder, baking soda, and salt until well combined and set aside.
Step 2: Make the Red Velvet Batter
In a large mixing bowl, cream together the softened butter and granulated sugar until light and fluffy, about 3-4 minutes on medium speed. This extended creaming creates air pockets essential for a tender crumb. Add eggs one at a time, beating well after each addition. In a separate measuring cup, combine buttermilk, red food coloring, vinegar, and vanilla extract. Gradually add the dry ingredients to the butter mixture, alternating with the buttermilk mixture, beginning and ending with the flour mixture (3 additions of flour, 2 of liquid). Mix just until incorporated, being careful not to overmix.
Step 3: Prepare the Cream Cheese Filling
In a medium bowl, beat softened cream cheese and sugar until smooth and creamy. Add the egg and vanilla, mixing until just combined. The mixture should be smooth but not overly aerated.
Step 4: Assemble and Create Marble Effect
Pour two-thirds of the red velvet batter into the prepared bundt pan. Spoon the cream cheese filling over the batter, keeping it away from the edges of the pan. Top with the remaining red velvet batter. Use a knife or thin spatula to gently swirl the batters together with 5-6 figure-eight motions. Tap the pan gently on the counter to release any air bubbles.
Step 5: Bake and Cool
Bake for 50-55 minutes, or until a wooden skewer inserted into the center comes out clean or with a few moist crumbs. Allow the cake to cool in the pan for exactly 15 minutes, then carefully invert onto a cooling rack to cool completely before glazing.
Step 6: Prepare and Apply the Glaze
Beat the cream cheese until smooth, then add powdered sugar, milk, and vanilla extract, adjusting milk quantity to reach desired consistency. Once the cake is completely cool, drizzle the glaze over the cake, allowing it to run down the ridges for a beautiful presentation.
Variations
Chocolate Chip Red Velvet Bundt Cake
Transform your Red Velvet Cream Cheese Bundt Cake by adding 1 cup of mini chocolate chips to the red velvet batter just before pouring it into the pan. The chocolate chips add delightful pockets of melty chocolate throughout the cake that complement the cocoa notes in the red velvet batter. For best results, toss the mini chips in 1 tablespoon of flour before adding them to prevent sinking during baking. This variation creates an even more indulgent dessert that chocolate lovers will adore.
White Chocolate Raspberry Red Velvet
Create a fruity twist by adding ½ cup white chocolate chips to the cream cheese filling and swirling 3 tablespoons of raspberry preserves into the assembled cake before baking. The bright berry flavor cuts through the richness of the Red Velvet Cream Cheese Bundt Cake, while white chocolate adds sweet, creamy notes. For the glaze, add 1 tablespoon raspberry preserves to create a pink-tinted topping that enhances both the flavor and visual appeal of this spectacular variation.
Gluten-Free Adaptation
For those with gluten sensitivities, substitute the all-purpose flour with a high-quality cup-for-cup gluten-free baking blend. Add ¼ teaspoon xanthan gum if your blend doesn’t already include it to maintain proper structure. The rich flavor profile of the Red Velvet Cream Cheese Bundt Cake makes it particularly successful as a gluten-free adaptation since the cocoa powder and cream cheese filling provide consistent flavor and moisture regardless of flour type.
Storage and Serving
Your Red Velvet Cream Cheese Bundt Cake will maintain perfect freshness at room temperature for up to 2 days when stored in an airtight container. For longer storage, refrigerate for up to 5 days, though I recommend bringing slices to room temperature before serving to restore that melt-in-your-mouth texture. This cake also freezes beautifully – wrap individual slices tightly in plastic wrap, then aluminum foil, and freeze for up to 3 months. Thaw overnight in the refrigerator for best results.
For a spectacular presentation, serve slices with a dollop of lightly sweetened whipped cream and fresh berries on the side. The bright, fresh fruit provides a beautiful color contrast to the deep red cake while cutting through the richness. For an indulgent dessert experience, warm individual slices for 10-15 seconds in the microwave and top with a small scoop of vanilla bean ice cream, allowing it to melt slightly into the cake. When entertaining, dust the glazed cake with a light sprinkle of crushed freeze-dried raspberries for a professional finishing touch that hints at the flavors to come.
FAQs
Why did my bundt cake stick to the pan?
The most common reason for sticking is insufficient pan preparation. For foolproof results with Red Velvet Cream Cheese Bundt Cake, use a baking spray containing flour immediately before filling the pan, ensuring every crevice is coated. Also critical is the cooling time—exactly 15 minutes allows the cake to set enough to release while preventing it from cooling completely in the pan.
Can I make this cake without food coloring?
Yes, you can omit the red food coloring entirely for a naturally light brown “velvet” cake with the same delicious flavor profile. Alternatively, use 2 tablespoons of beetroot powder for natural coloring, though the red will be more subdued than with artificial coloring.
Why is my cream cheese filling sinking to the bottom?
If your cream cheese mixture is too thin, it may sink during baking. Ensure your cream cheese is just softened, not melted, and that you’re not overmixing the filling, which can incorporate too much air. Also, layering the batter as directed—with red velvet on bottom and top—helps sandwich the filling in place.
How do I prevent my cake from doming and cracking?
Baking at a slightly lower temperature (325°F instead of 350°F) helps Red Velvet Cream Cheese Bundt Cake bake more evenly. Ensure your oven is properly calibrated, and position the rack in the middle of the oven. The cream cheese filling also helps maintain moisture throughout baking, reducing the likelihood of cracking.
Can I make this cake ahead for a special occasion?
Absolutely! This cake actually improves with a day of rest as the flavors meld. Prepare the cake up to two days ahead, but add the glaze the day of serving for the freshest appearance. If needed, you can freeze the unglazed cake for up to a month, thaw overnight in the refrigerator, and add fresh glaze before serving.
Red Velvet Cream Cheese Bundt Cake
- Prep Time: 30 minutes
- Cook Time: 50-55 minutes
- Total Time: 1 hour 20 minutes
- Yield: 12 servings 1x
- Category: Dessert
- Method: Baking
- Cuisine: Americaine
Description
Indulge in a decadent Red Velvet Cream Cheese Bundt Cake with rich cocoa, tangy cream cheese, and a moist, crowd-pleasing texture.
Ingredients
- 2½ cups (310g) all-purpose flour
- 2 tablespoons (12g) unsweetened cocoa powder
- 1 teaspoon baking soda
- ½ teaspoon salt
- ½ cup (115g) unsalted butter, softened
- 1½ cups (300g) granulated sugar
- 2 large eggs, at room temperature
- 1 cup (240ml) buttermilk, at room temperature
- 2 tablespoons (30ml) liquid red food coloring
- 1 teaspoon white vinegar
- 1 teaspoon vanilla extract
- 8 oz (225g) cream cheese, softened
- ¼ cup (50g) granulated sugar
- 1 large egg
- 1 teaspoon vanilla extract
- 4 oz (113g) cream cheese, softened
- 1 cup (120g) powdered sugar
- 3–4 tablespoons (45-60ml) milk
- ½ teaspoon vanilla extract
Instructions
- Step 1: Prepare Your Equipment Preheat your oven to 325°F (165°C). Thoroughly grease a 10-12 cup bundt pan with baking spray containing flour, ensuring you coat all crevices. In a medium bowl, whisk together flour, cocoa powder, baking soda, and salt until well combined and set aside.
- Step 2: Make the Red Velvet Batter In a large mixing bowl, cream together the softened butter and granulated sugar until light and fluffy, about 3-4 minutes on medium speed. This extended creaming creates air pockets essential for a tender crumb. Add eggs one at a time, beating well after each addition. In a separate measuring cup, combine buttermilk, red food coloring, vinegar, and vanilla extract. Gradually add the dry ingredients to the butter mixture, alternating with the buttermilk mixture, beginning and ending with the flour mixture (3 additions of flour, 2 of liquid). Mix just until incorporated, being careful not to overmix.
- Step 3: Prepare the Cream Cheese Filling In a medium bowl, beat softened cream cheese and sugar until smooth and creamy. Add the egg and vanilla, mixing until just combined. The mixture should be smooth but not overly aerated.
- Step 4: Assemble and Create Marble Effect Pour two-thirds of the red velvet batter into the prepared bundt pan. Spoon the cream cheese filling over the batter, keeping it away from the edges of the pan. Top with the remaining red velvet batter. Use a knife or thin spatula to gently swirl the batters together with 5-6 figure-eight motions. Tap the pan gently on the counter to release any air bubbles.
- Step 5: Bake and Cool Bake for 50-55 minutes, or until a wooden skewer inserted into the center comes out clean or with a few moist crumbs. Allow the cake to cool in the pan for exactly 15 minutes, then carefully invert onto a cooling rack to cool completely before glazing.
- Step 6: Prepare and Apply the Glaze Beat the cream cheese until smooth, then add powdered sugar, milk, and vanilla extract, adjusting milk quantity to reach desired consistency. Once the cake is completely cool, drizzle the glaze over the cake, allowing it to run down the ridges for a beautiful presentation.
Notes
Fresh ingredients will always yield the best flavor results.
Nutrition
- Serving Size: 1 slice
- Calories: 380 kcal
- Sugar: 25g
- Sodium: 320mg
- Fat: 18g
- Saturated Fat: 10g
- Unsaturated Fat: 6g
- Trans Fat: 0g
- Carbohydrates: 48g
- Fiber: 1g
- Protein: 6g
- Cholesterol: 100mg