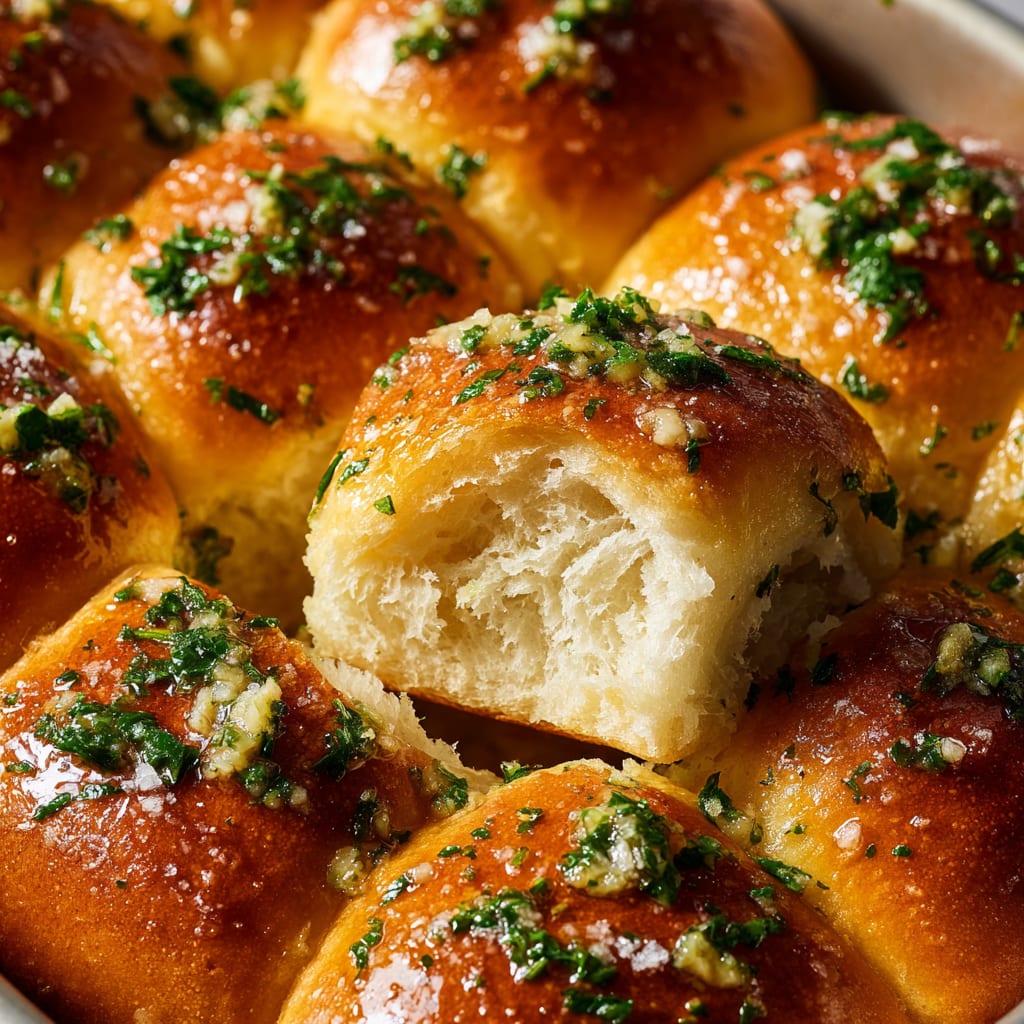
Imagine sinking your teeth into warm, fluffy Garlic Bread Rolls with a buttery, aromatic garlic crust that crackles just slightly before giving way to the pillowy interior. These homemade garlic bread rolls combine the comfort of freshly baked bread with the irresistible allure of garlic butter, creating a side dish that frequently outshines the main course. Perfect for weeknight dinners, special occasions, or when you simply crave something heartwarming and delicious, these rolls elevate any meal from ordinary to extraordinary. You’ll learn how to create bakery-quality garlic bread rolls with a perfect texture, balanced flavor, and that professional touch that will have everyone reaching for seconds.
Why You’ll Love This Recipe
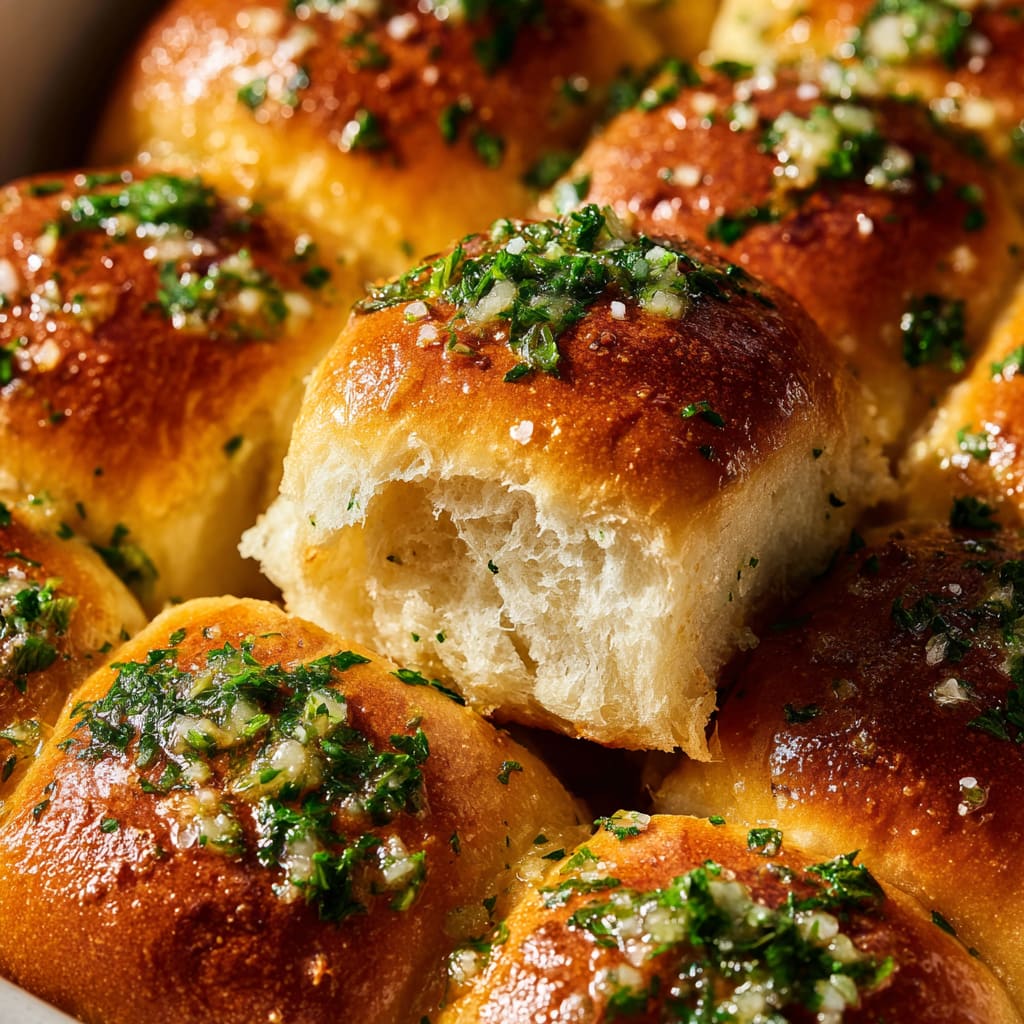
These garlic bread rolls are about to become your new favorite bread recipe for several compelling reasons. First, the contrast between the soft, tender interior and the slightly crispy, garlic-infused exterior creates a textural experience that store-bought versions simply can’t match. The aroma alone will draw family members to the kitchen before they’re even out of the oven.
What sets these homemade garlic rolls apart is the perfect balance of flavors – the rich butter, fragrant garlic, and fresh herbs create harmony without any single element overpowering the others. Even better, they’re surprisingly simple to make, requiring basic pantry ingredients and straightforward techniques that even novice bakers can master.
These versatile rolls complement virtually any meal, from Italian pasta dishes to hearty soups or simple salads. They’re also incredibly customizable, allowing you to adjust the garlic intensity or herb combinations to suit your preferences. The rolls maintain their freshness for days, though they rarely last that long before being devoured! Whether you’re a seasoned baker or just starting your bread-making journey, these garlic bread rolls deliver impressive results with minimal effort.
Ingredients
For the Dough:
- 4 cups (500g) all-purpose flour
- 2¼ teaspoons (7g) instant yeast (1 standard packet)
- 2 tablespoons (25g) granulated sugar
- 1½ teaspoons (9g) salt
- 1 cup (240ml) warm milk (around 110°F/43°C)
- ¼ cup (60ml) warm water
- 3 tablespoons (42g) unsalted butter, melted
- 1 large egg, at room temperature
For the Garlic Butter:
- ½ cup (113g) unsalted butter, softened
- 4 large garlic cloves, minced (about 2 tablespoons)
- 2 tablespoons fresh parsley, finely chopped
- 1 tablespoon fresh chives, finely chopped (optional)
- ½ teaspoon dried oregano
- ¼ teaspoon salt
- 2 tablespoons grated Parmesan cheese (optional)
The quality of your garlic makes a significant difference in these garlic bread rolls. Fresh garlic cloves provide a more vibrant, aromatic flavor than pre-minced alternatives. For the butter, using unsalted allows you to control the salt level precisely, while the combination of fresh and dried herbs creates a more complex flavor profile.
Pro Tips
Achieving bakery-quality garlic bread rolls at home hinges on these three critical techniques:
Perfect Yeast Activation: Temperature control is crucial when working with yeast. Your milk and water should be warm (110°F/43°C) – not hot, which kills yeast, or cool, which prevents proper activation. The liquid should feel warm to your wrist but not hot. If using active dry yeast instead of instant, allow it to bloom in the warm liquid with a pinch of sugar for 5-10 minutes until foamy before proceeding with the recipe.
Kneading Technique: Proper kneading develops the gluten that gives these rolls their perfect texture. Knead the dough until it passes the “window pane test” – when you can stretch a small piece thin enough to see light through without tearing. This usually takes 8-10 minutes by hand or 5-6 minutes in a stand mixer. The dough should feel smooth and elastic, not sticky or tough.
Garlic Preparation: For the most flavorful garlic butter, prepare it at least 30 minutes before using (or up to a day ahead). This allows the garlic oils to infuse the butter completely. For a more mellow garlic flavor, sauté the minced garlic in a little butter for 30 seconds before mixing it into the remaining butter. This removes the raw edge while preserving the aromatic qualities that make these garlic bread rolls so irresistible.
Instructions
Step 1: Prepare the Dough
In a large bowl, combine the flour, instant yeast, sugar, and salt, mixing thoroughly. In a separate bowl, whisk together the warm milk, water, melted butter, and egg until well combined. Make a well in the center of the dry ingredients and pour in the wet mixture. Stir with a wooden spoon until a shaggy dough forms. Turn the dough onto a lightly floured surface and knead for 8-10 minutes until smooth and elastic. The dough should spring back when lightly pressed with your finger.
Step 2: First Rise
Place the dough in a lightly oiled bowl, turning once to coat both sides. Cover with plastic wrap or a clean kitchen towel and let rise in a warm spot until doubled in size, about 1-1½ hours. The ideal rising environment is around 75°F (24°C). If your kitchen is cool, you can create a warm environment by placing the bowl in an oven that has been turned on briefly and then off.
Step 3: Prepare Garlic Butter
While the dough rises, mix the softened butter, minced garlic, parsley, chives, oregano, salt, and Parmesan cheese (if using) until thoroughly combined. Set aside at room temperature to allow the flavors to meld. This garlic butter mixture is what transforms ordinary rolls into exceptional garlic bread rolls with layers of flavor.
Step 4: Shape the Rolls
After the dough has doubled, punch it down gently to release air bubbles. Divide the dough into 12-15 equal pieces (about 2-3 oz/55-85g each). For perfectly uniform rolls, use a kitchen scale. Shape each piece into a ball by pulling the edges toward the center and pinching to seal, then rolling between your palms to create tension on the surface.
Step 5: Second Rise and Baking
Place the shaped rolls in a greased 9×13-inch baking pan, spacing them evenly. Cover and let rise again until puffy, about 30-45 minutes. Meanwhile, preheat your oven to 375°F (190°C). Just before baking, gently brush the tops with half of the garlic butter mixture. Bake for 18-22 minutes until the tops are golden brown and the internal temperature reaches 190°F (88°C).
Step 6: Finish with Garlic Butter
Remove the garlic bread rolls from the oven and immediately brush with the remaining garlic butter, making sure to get some of the minced garlic and herbs on each roll. The heat from the freshly baked rolls will help melt the butter and infuse the flavors deeper. Allow to cool for 5-10 minutes before serving warm.
Variations
Cheese-Stuffed Garlic Rolls
Transform these garlic bread rolls into a cheese lover’s dream by stuffing each portion of dough with a cube of mozzarella or other melting cheese before shaping. After the first rise and dividing the dough, flatten each piece, place a 1/2-inch cube of cheese in the center, then fold and pinch the dough around it before shaping into a ball. The result is a delightful cheesy surprise in the center of each warm roll.
Whole Wheat Garlic Knots
For a heartier, more nutritious version, substitute half of the all-purpose flour with whole wheat flour. After dividing the dough, roll each piece into a 7-inch rope and tie into a simple knot. The whole grain adds a nutty flavor that complements the garlic butter beautifully, while the knot shape creates more surface area for that delicious garlic butter to cling to.
Herb and Garlic Focaccia Style
Instead of individual rolls, press the dough into a 9×13-inch baking pan after the first rise. Dimple the surface with your fingertips, then drizzle with the garlic butter and sprinkle with additional herbs and flaky sea salt. Bake as directed (possibly a few minutes longer) and cut into squares to serve. This variation offers a different texture with the same wonderful garlic bread flavor profile.
Storage and Serving
These garlic bread rolls maintain their quality remarkably well when stored properly. For short-term storage (1-2 days), place completely cooled rolls in an airtight container at room temperature. For longer storage (up to 5 days), refrigerate in an airtight container and reheat before serving. To freeze, wrap individual rolls tightly in plastic wrap, then aluminum foil, and store in a freezer bag for up to 3 months. Thaw at room temperature and reheat in a 300°F (150°C) oven for 5-7 minutes until warm.
When serving these versatile garlic bread rolls, consider these enticing pairings:
- Alongside pasta dishes like spaghetti Bolognese or fettuccine Alfredo, using them to soak up every last bit of sauce
- With hearty soups such as minestrone, tomato bisque, or classic beef stew
- As the bread component of a DIY garlic bread roll sandwich – slice them horizontally, add deli meats, cheeses, and vegetables for an elevated lunch experience
For an extra touch of indulgence, serve warm with a side of marinara sauce for dipping, transforming them into a satisfying appetizer that guests won’t be able to resist.
FAQs
Can I make the dough ahead of time?
Yes! You can prepare the dough and refrigerate it after the first rise for up to 24 hours. Shape the cold dough into rolls, then allow additional time (about 1-1½ hours) for the second rise before baking.
Why didn’t my rolls rise properly?
This typically happens when the yeast is old or was killed by liquid that was too hot. Check your yeast’s expiration date and ensure your liquids are warm (110°F/43°C), not hot. Also, rising in too cold an environment will significantly slow the process.
Can I use pre-minced garlic from a jar?
While fresh garlic provides the best flavor for garlic bread rolls, jarred garlic can work in a pinch. Use about 1½ tablespoons of jarred minced garlic to replace the 4 fresh cloves.
How can I tell when the rolls are done baking?
Properly baked rolls should be golden brown on top and have an internal temperature of 190°F (88°C). If you don’t have a thermometer, tap the bottom of a roll – it should sound hollow when done.
Can I make these dairy-free?
Yes! Substitute plant-based milk and butter alternatives in equal amounts. For the best results, choose unsweetened, unflavored plant milk and a butter alternative that’s suitable for baking.
Garlic Bread Rolls
- Prep Time: 30 minutes
- Cook Time: 20 minutes
- Total Time: 2 hours
- Yield: 12–15 rolls 1x
- Category: Appetizer
- Method: Baking
- Cuisine: Americaine
Description
Garlic Bread Rolls: Soft rolls stuffed with garlic butter, perfect for quick, comforting indulgence. A crowd-pleasing recipe.
Ingredients
- 4 cups (500g) all-purpose flour
- 2¼ teaspoons (7g) instant yeast (1 standard packet)
- 2 tablespoons (25g) granulated sugar
- 1½ teaspoons (9g) salt
- 1 cup (240ml) warm milk (around 110°F/43°C)
- ¼ cup (60ml) warm water
- 3 tablespoons (42g) unsalted butter, melted
- 1 large egg, at room temperature
- ½ cup (113g) unsalted butter, softened
- 4 large garlic cloves, minced (about 2 tablespoons)
- 2 tablespoons fresh parsley, finely chopped
- 1 tablespoon fresh chives, finely chopped (optional)
- ½ teaspoon dried oregano
- ¼ teaspoon salt
- 2 tablespoons grated Parmesan cheese (optional)
Instructions
- Step 1: Prepare the Dough In a large bowl, combine the flour, instant yeast, sugar, and salt, mixing thoroughly. In a separate bowl, whisk together the warm milk, water, melted butter, and egg until well combined. Make a well in the center of the dry ingredients and pour in the wet mixture. Stir with a wooden spoon until a shaggy dough forms. Turn the dough onto a lightly floured surface and knead for 8-10 minutes until smooth and elastic. The dough should spring back when lightly pressed with your finger.
- Step 2: First Rise Place the dough in a lightly oiled bowl, turning once to coat both sides. Cover with plastic wrap or a clean kitchen towel and let rise in a warm spot until doubled in size, about 1-1½ hours. The ideal rising environment is around 75°F (24°C). If your kitchen is cool, you can create a warm environment by placing the bowl in an oven that has been turned on briefly and then off.
- Step 3: Prepare Garlic Butter While the dough rises, mix the softened butter, minced garlic, parsley, chives, oregano, salt, and Parmesan cheese (if using) until thoroughly combined. Set aside at room temperature to allow the flavors to meld. This garlic butter mixture is what transforms ordinary rolls into exceptional garlic bread rolls with layers of flavor.
- Step 4: Shape the Rolls After the dough has doubled, punch it down gently to release air bubbles. Divide the dough into 12-15 equal pieces (about 2-3 oz/55-85g each). For perfectly uniform rolls, use a kitchen scale. Shape each piece into a ball by pulling the edges toward the center and pinching to seal, then rolling between your palms to create tension on the surface.
- Step 5: Second Rise and Baking Place the shaped rolls in a greased 9×13-inch baking pan, spacing them evenly. Cover and let rise again until puffy, about 30-45 minutes. Meanwhile, preheat your oven to 375°F (190°C). Just before baking, gently brush the tops with half of the garlic butter mixture. Bake for 18-22 minutes until the tops are golden brown and the internal temperature reaches 190°F (88°C).
- Step 6: Finish with Garlic Butter Remove the garlic bread rolls from the oven and immediately brush with the remaining garlic butter, making sure to get some of the minced garlic and herbs on each roll. The heat from the freshly baked rolls will help melt the butter and infuse the flavors deeper. Allow to cool for 5-10 minutes before serving warm.
- Step 7: Variations Transform these garlic bread rolls into a cheese lover’s dream by stuffing each portion of dough with a cube of mozzarella or other melting cheese before shaping. For a heartier, more nutritious version, substitute half of the all-purpose flour with whole wheat flour. Instead of individual rolls, press the dough into a 9×13-inch baking pan after the first rise and drizzle with the garlic butter and additional herbs.
- Step 8: Storage and Serving These garlic bread rolls maintain their quality remarkably well when stored properly. For short-term storage (1-2 days), place completely cooled rolls in an airtight container at room temperature. For longer storage (up to 5 days), refrigerate in an airtight container and reheat before serving. To freeze, wrap individual rolls tightly in plastic wrap, then aluminum foil, and store in a freezer bag for up to 3 months. When serving these versatile garlic bread rolls, consider pairings with pasta dishes, hearty soups, or as part of a garlic bread roll sandwich.
- Step 9: FAQs Yes! You can prepare the dough and refrigerate it after the first rise for up to 24 hours. Ensure your liquids are warm enough to activate the yeast properly. Properly baked rolls should be golden brown on top and have an internal temperature of 190°F (88°C). Jarred minced garlic can be used instead of fresh, though fresh garlic provides the best flavor. You can make these dairy-free by using plant-based milk and butter alternatives.
Notes
Fresh ingredients will always yield the best flavor results.
Nutrition
- Serving Size: 1 roll
- Calories: 230
- Sugar: 2g
- Sodium: 240mg
- Fat: 12g
- Saturated Fat: 7g
- Unsaturated Fat: 4g
- Trans Fat: 0g
- Carbohydrates: 25g
- Fiber: 1g
- Protein: 4g
- Cholesterol: 40mg